20 Unique And Beautiful Braided Hairstyles For Girls
Be the showstopper and go creative with your hairstyles to look beautiful.
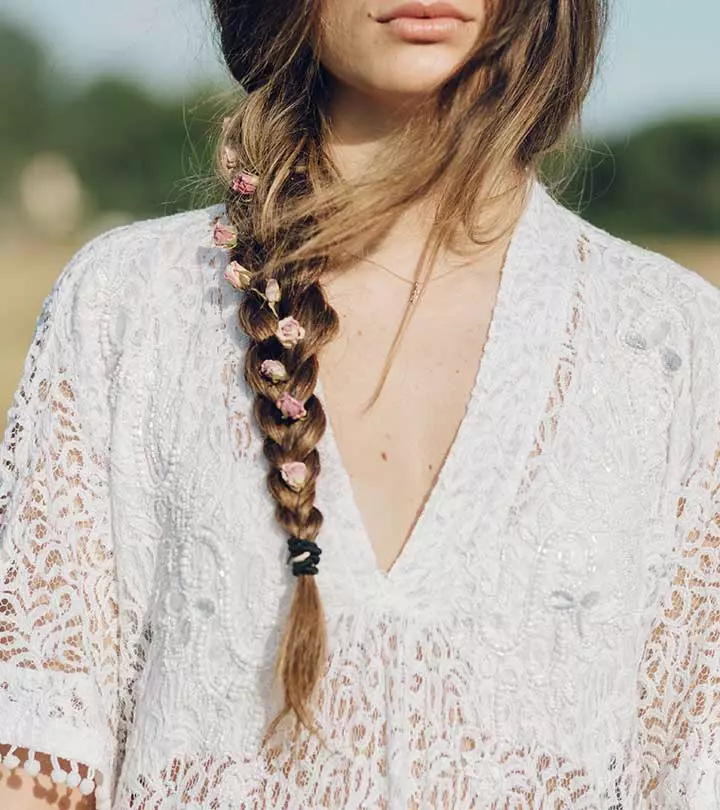
Intricately woven sections of the hair, entwined together to form an exquisite work of art displayed on your head! Braids are one of the classiest hairstyles ever to grace the earth.
This is why we are discussing braided hairstyles for girls, and there are so many choices to pick from.
From two-strands to five-stranded weaves, braids can be very easy or super intricate. And you can let your creativity and personality show through the braid you flaunt. You can go for a simple yet elegant French braid or opt for something more artistic and messy like the boho-fishtail braid.
Scroll down to explore the many braid options you can try and how you can achieve the desired look.
1. Lace Headband Braid

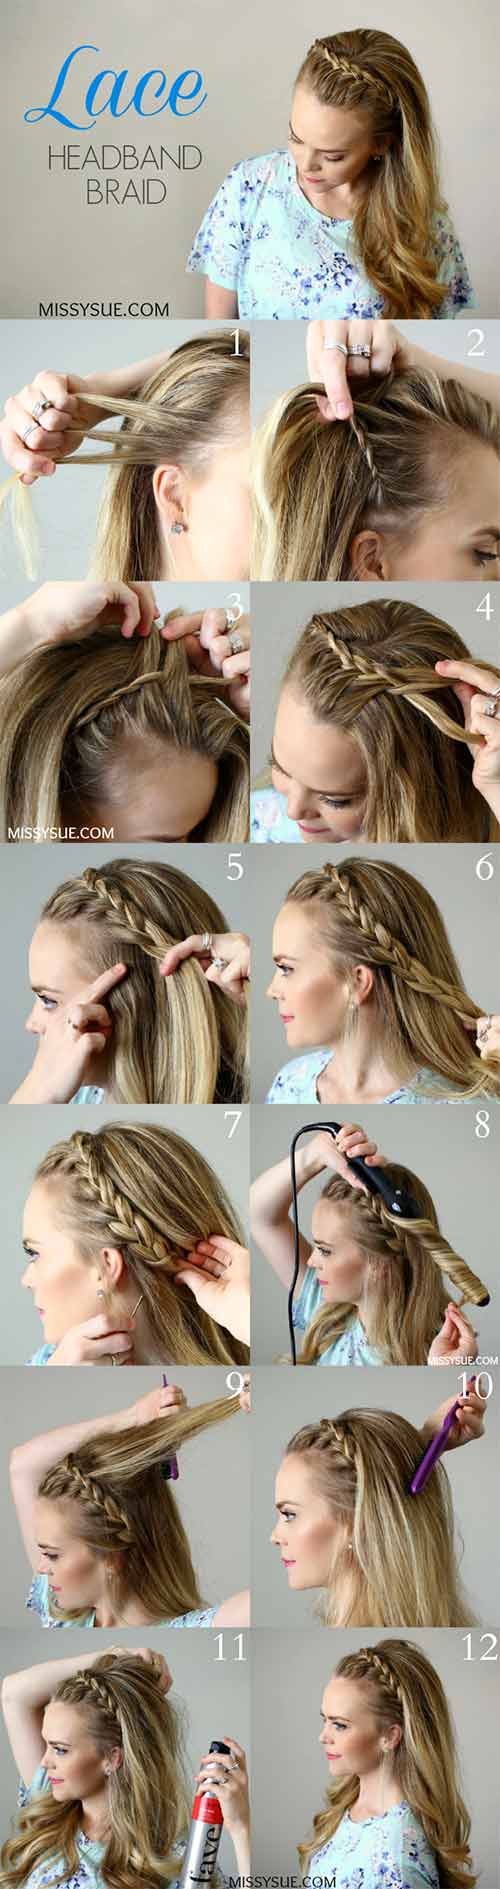
What You Need
- Comb
- Hair pins
- Curling iron
- Teasing comb
- Hairspray
Procedure
- Take three small equal sections of hair from right above your ear and begin a French braid. You’ll need to braid it upwards and along the hairline.
- As you move along the hairline, keep adding hair to the side that is the closest to the hairline. Don’t add hair to the middle and other side section. This will create a pulled-through look in the front.
- Keep weaving the braid until you reach the ear on the opposite side.
- Now, complete the braid as you would a regular braid.
- Neatly pin up the regular braid underneath your hair.
- Using a curling iron, make your hair a little wavy to add volume. Keep your hair in the curler for about three seconds.
- Backcomb the hair at the crown. This will create a pouf look right behind the lace braid.
- Spritz on some hairspray.
2. Double French Braid Top Knot

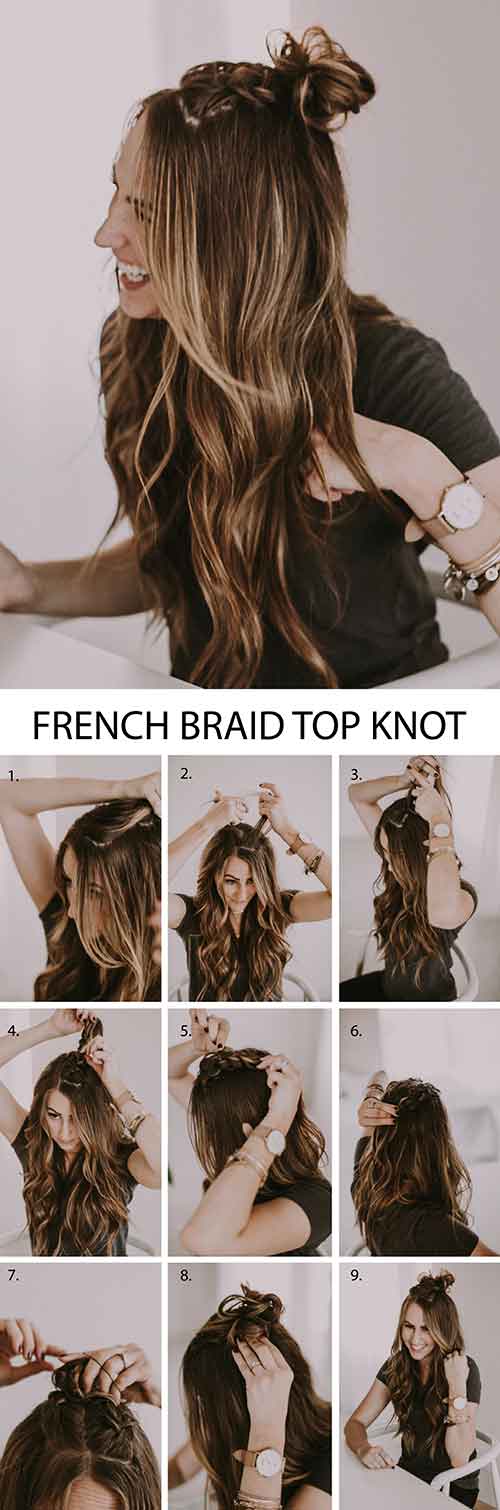
What You Need
- Comb
- Hair pins
- Elastic band
Procedure
- Part your hair down the middle.
- Take a section of hair from the front, from one side of the parting.
- Divide it into three sections and French braid it.
- Once it reaches the back of your head, secure it with some hair pins.
- Repeat the same on the other half.
- Twist the ends of both the braids them together so that they form a half bun. Secure it in place with an elastic band and hair pins.
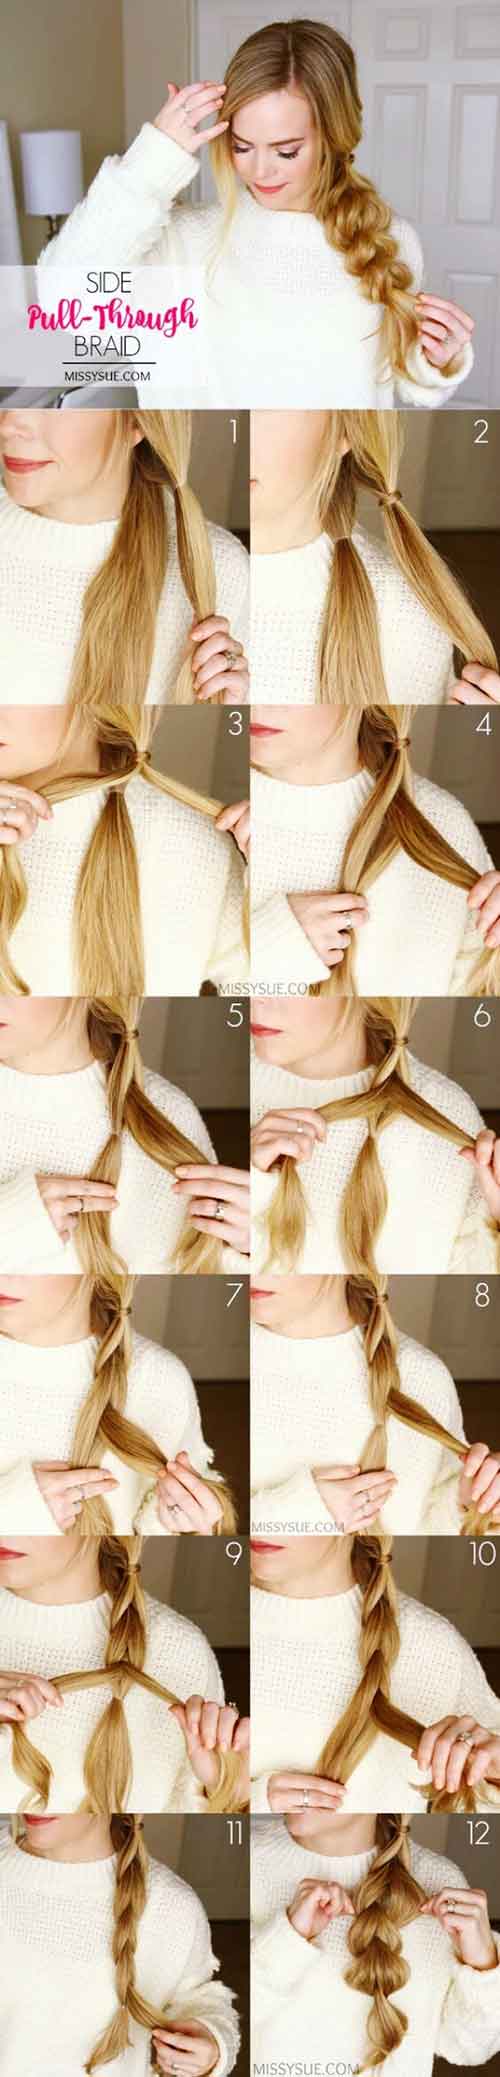
3. Pull Through Braid

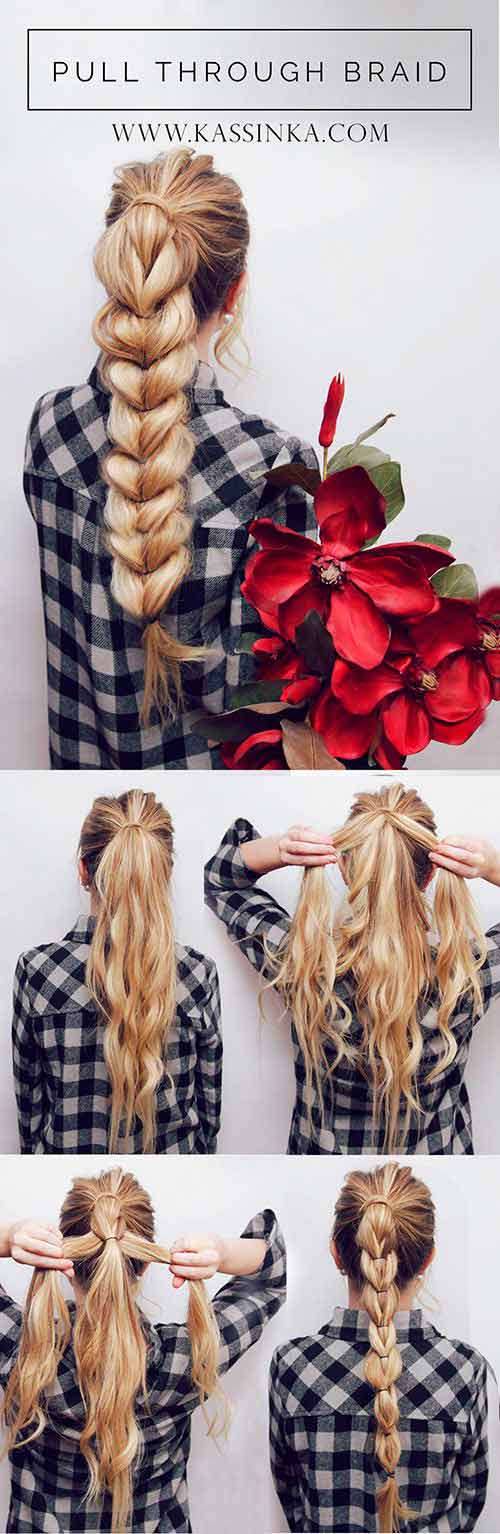
What You Need
- Comb
- Elastic bands
Procedure
- Tie your hair in a high ponytail using an elastic band.
- Divide the ponytail into three sections – two side sections and a large middle section.
- Twist the two side sections behind the large middle section, bring them in front of the middle section and tie both the side sections together using an elastic band. This will transform the side sections into one middle section.
- Divide the previous middle section to form two side sections and repeat the above steps. Keep using elastic bands to tie the new middle sections.
- Continue doing this until you are about three inches above the end of your hair. Using an elastic band, tie all the three sections together.
- Pancake the braid to make it look bigger.
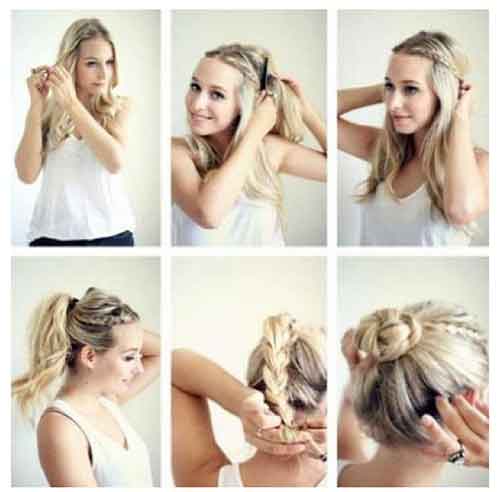
4. Half Up Boho Braids


What You Need
- Comb
- Hair pins
- Elastic bands
Procedure
- Detangle your hair with a comb. Part it down the middle.
- Take a 3-inch section of hair from one side of your head and braid it till the end. Secure its ends with an elastic band. Repeat the same on the same side. You now have two braids.
- Create two braids in the same manner on the other side.
- Pancake the braids.
- Take some hair from both sides (from under the braids) and pin it in the center at the back of your head.
- Lift the braids, wrap them along the bac
- k of your head, and pin them on the opposite side.
- Make sure you pick up braids alternately from each side.
5. Messy Pigtails Braid

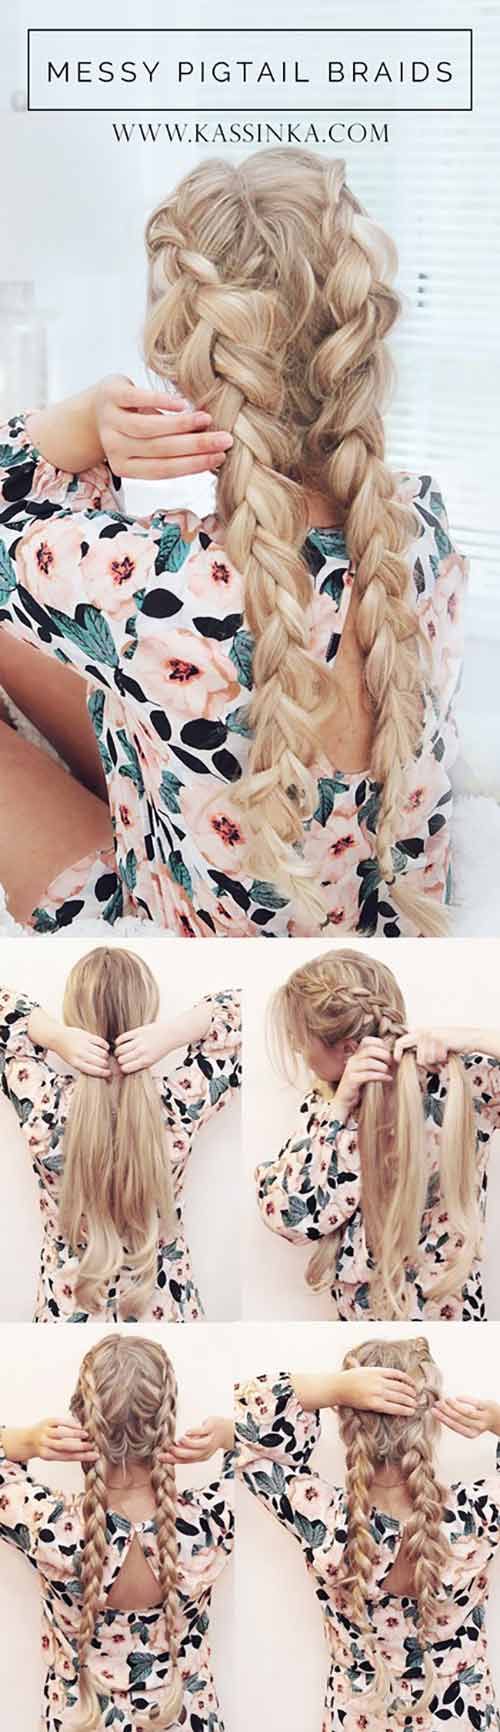
What You Need
- Comb
- Elastic bands
Procedure
- Part your hair down the middle and divide it into two halves.
- Starting from the front, weave all the hair on one side into a Dutch braid. Braid it till the end and secure it with an elastic band.
- Repeat the same on the other side.
- Pancake your braids to add dimension. You can use pins to secure your braids in place.
6. Half Up Faux Hawk

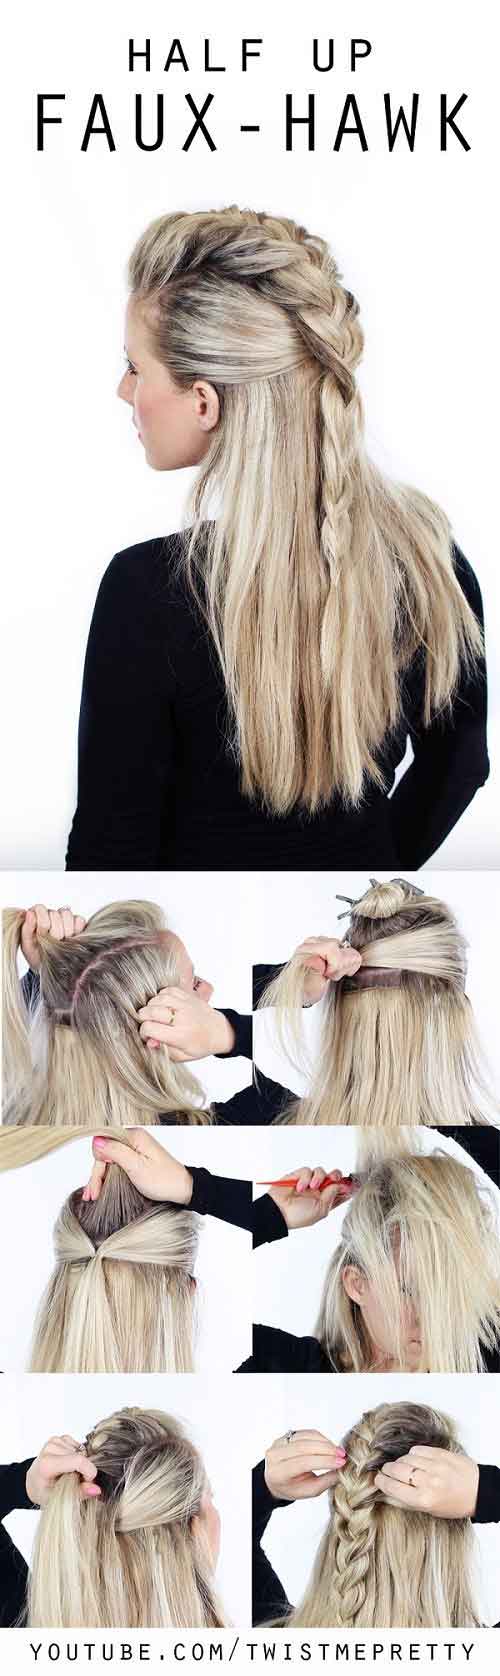
What You Need
- Comb
- Elastic bands
- Sectioning clip
Procedure
- Section off the hair at the front and top of your head.
- Take some hair from the sides and tie it into a half ponytail.
- Unclip the first section of hair and tease the hair at the crown of your head. This will add volume and height to your hairdo.
- Begin weaving that section of hair into a Dutch braid. Tie it at the end with an elastic band.
- Pancake the braid to make it look voluminous.
7. Half Up Fishtail Braid

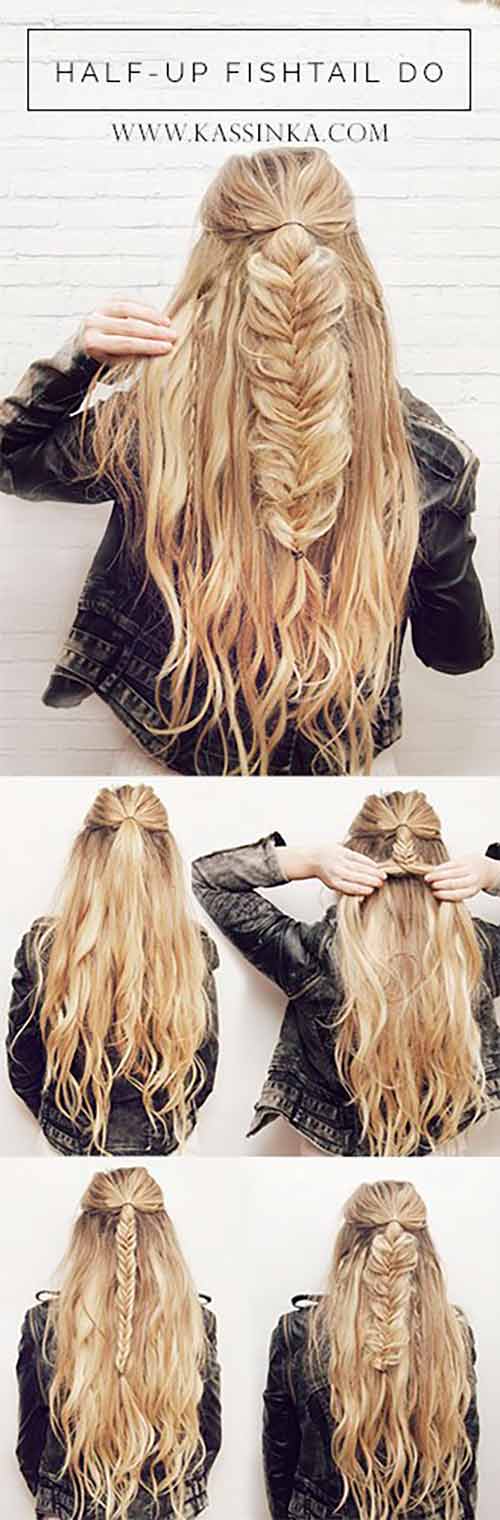
What You Need
- Comb
- Elastic bands
Procedure
- Take some hair from the sides and tie it in a half ponytail.
- Weave the hair in the half ponytail in a fishtail braid.
- Secure the half fishtail braid with an elastic band.
- Pancake the braid to make it look good.
- You can do a couple of thin accent braids on either side to complete the look.
8. Braided Ponytail

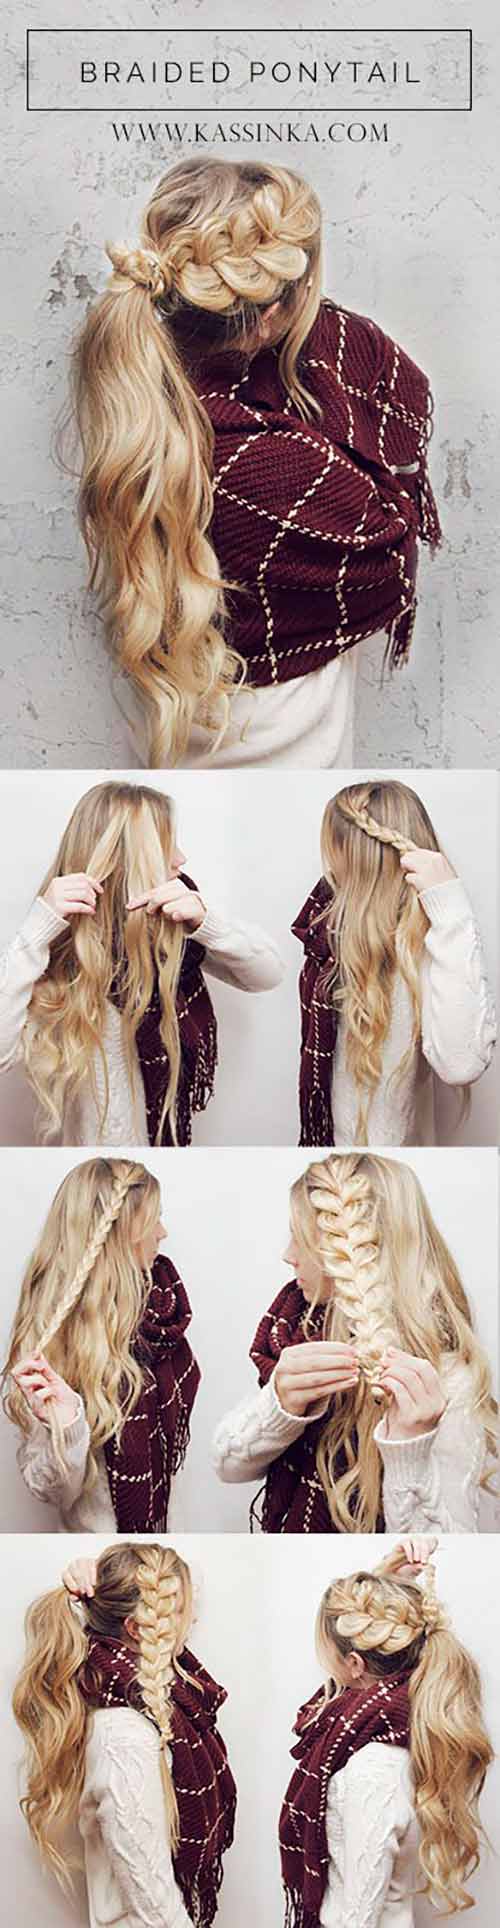
What You Need
- Comb
- Hair pins
- Elastic bands
Procedure
- Comb your hair to detangle it. Part it on one side.
- Take a section of hair from the side of the parting with more hair. Weave it into a Dutch braid and secure the ends with an elastic band.
- Pancake the braid to make it look bigger.
- Take the rest of your hair in and tie it in a mid-level ponytail.
- Wrap the braid over the elastic band of the ponytail. You can use pins to secure it in place.
9. Mermaid Braid

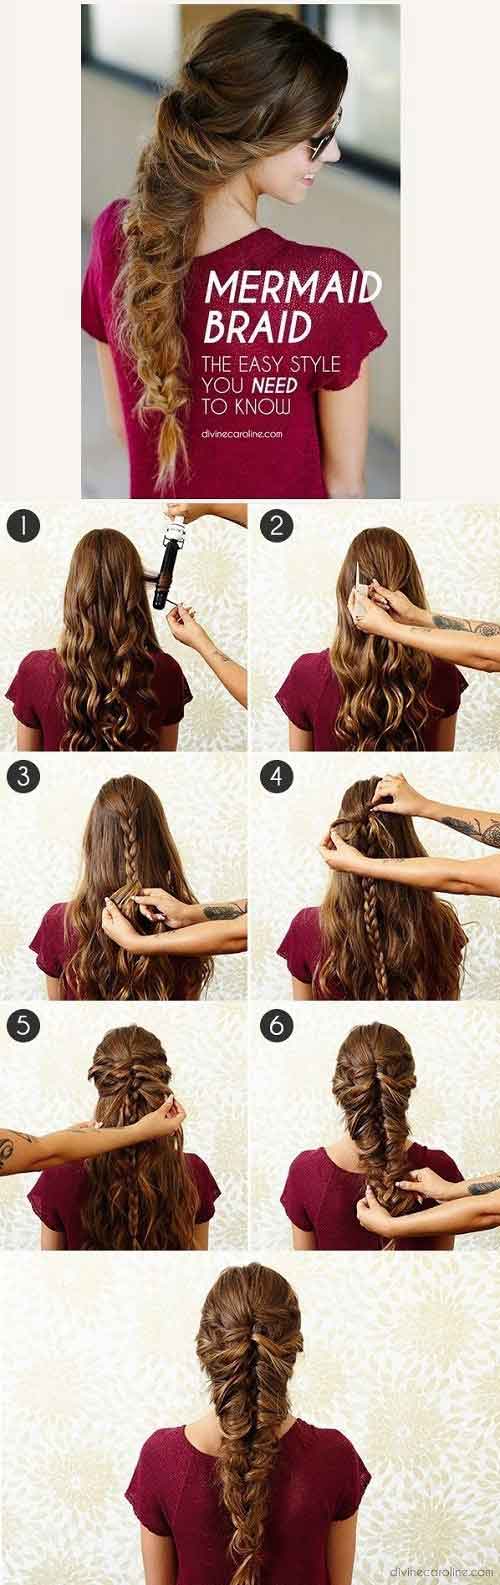
What You Need
- Comb
- Elastic bands
- Curling iron
Procedure
- The mermaid braid looks incredible on curly hair. So, using a curler, curl your hair. Leave your hair in the curler for about 5 seconds before releasing the clip. Don’t touch your hair until it has cooled down.
- Tie some hair from the front in a half ponytail.
- Weave the half ponytail into a braid. Tie it at the end with an elastic band. Remove the elastic band at the top.
- Now, take a small section of hair from one side, right from the top, and pass it through the first stitch of the braid.
- Pick up a section of hair from the other side, merge it with the first section of hair that you pulled through the hair previously, and pass it through the second stitch of the braid.
- Repeat this step until you have weaved all your hair till the end of the braid. Secure the ends with an elastic band.
- Pancake the mermaid braid.
10. Side Braids

What You Need
- Comb
- Hair pins
- Elastic bands
Procedure
- Part your hair on one side.
- Weave a Dutch braid on the side of the parting that has more hair. Stop braiding near the nape of your neck. Pin the braid in place.
- Twist the hair on the other side and, again, pin it near the nape of your neck.
- Merge all your hair and begin weaving a fishtail braid on the same side as the first braid.
- Secure the ends with an elastic band.
- Pancake the fishtail braid.
11. Double Dutch Bun Braid

What You Need
- Comb
- Hairpins
- Elastic bands
Procedure
- Part your hair down the middle.
- Take some hair from one side of your parting. Weave that section into a regular Dutch braid. Secure the ends with an elastic band.
- Repeat the same on the other side and pancake both braids.
- Take some hair from the nape of your neck and
- weave it into a regular braid.
- Leaving out the bottom braid, tie the rest of your hair along with the two Dutch side braids into a low messy bun.
- Wrap the bottom braid around the bun and pin it in place.
12. Pull-Through French Braid

What You Need
- Comb
- Elastic bands
- Claw clip
Procedure
- Take the front section of hair and tie it in a half ponytail
- Clip it on top of your head.
- Tie another half ponytail below the first ponytail.
- Unclip the first half ponytail and split it in two.
- Flip the second half ponytail over from between these two halves and clip it to your head.
- Now, join the two halves of the first half ponytail together and secure them with an elastic band.
- Keep tying more half ponytails and repeating these steps until you run out hair and the braid has reached the end of your hair.
- Pancake the braid.
13. The Large Braid


What You Need
- Comb
- Elastic bands
Procedure
- Divide your hair into three equal sections.
- Braid the three sections separately to create three braids.
- Pancake the three braids.
- Weave these three braids together to create one giant braid.
14. Redefined Side Pull-Through Braid

What You Need
- Comb
- Elastic bands
Procedure
- Sweep your hair to one side and divide it into two halves.
- Tie both halves into ponytails with elastic bands.
- Take a little hair from one ponytail and wrap it around the respective elastic band to cover it. Repeat the same on the other ponytail.
- Divide the first ponytail into halves and tie them together behind the second ponytail with an elastic.
- Repeat the same with the second ponytail.
- Continue this until the end. Secure the ends with an elastic band.
- Pancake the braid.
15. Braided Half Top Knot


What You Need
- Comb
- Hair pins
- Elastic band
Procedure
- Tie a half ponytail and secure it with an elastic band.
- Weave the half ponytail into a braid. Pancake the braid and tie it at the end with an elastic band.
- Roll the braid into a top knot. Tie it with an elastic band and secure it with pins.
16. Braided Halo

What You Need
- Comb
- Hair pins
- Elastic bands
Procedure
- Part your hair down the middle and divide it into two halves.
- Weave both the sections into braids on either side of your head.
- Lift the first braid, place it along the top of your head and pin it in place.
- Repeat the same with the other braid.
17. Braided Bun

What You Would Need
- Comb
- Hair pins
- Elastic bands
Procedure
- Part your hair down the middle.
- Take a 2-inch hair from one side and weave it into a braid.
- Secure the ends with an elastic band.
- Repeat the same on the other side.
- Pin both braids at the back of your head, near the crown.
- Tie all your hair in a high ponytail.
- Weave the ponytail into a braid.
- Roll the braid around itself to form a bun and secure it with hair pins.
18. Topsy Tail Braid

What You Would Need
- Comb
- Elastic bands
Procedure
- Tie some hair from the front in a half ponytail with an elastic band.
- Flip the ponytail by lifting it and passing it through the hair above the elastic band. This will form a twist above the elastic band.
- Take some hair from below the first half ponytail and tie it into another half ponytail.
- Flip the second half ponytail.
- Repeat the same until the end. Secure the ends with an elastic band.
- Pancake the braid.
19. Boho Braids With Bun

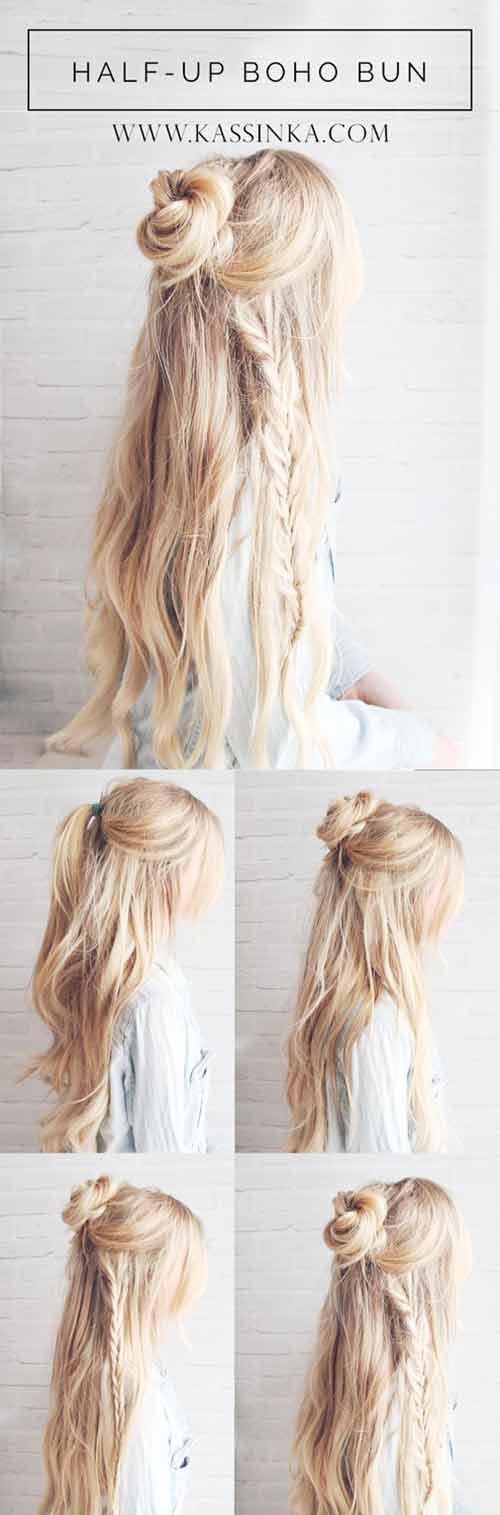
What You Need
- Comb
- Hair pins
- Elastic bands
Procedure
- Tie the front hair into a half ponytail with an elastic band.
- Wrap the half ponytail around itself to form a top knot.
- Secure it with hair pins.
- Take a small section of hair from the side, just below the top knot, and weave it into a fishtail braid.
- Pancake the braid.
20. Chic Faux Braid


What You Need
- Comb
- Elastic bands
- Texturizing cream
- Volumizing spray
- Hairspray
Procedure
- To try this hairstyle, your hair needs to have some texture. So, apply a texturizing cream after washing your hair.
- Spritz a good amount of volume spray on your hair thoroughly.
- Tie the front of your hair in a half ponytail using an elastic band.
- Take a little hair from the half ponytail and wrap it around the elastic band, pinning it in place. Now, pull the half ponytail through itself just above the elastic band to topsy tail it. This will create twists above the half ponytail.
- Tie another half ponytail below the first one and repeat the previous step.
- Keep repeating the same until all your hair is in the braid.
- Pancake the braid.
Braids are such a versatile and classic hairstyle. No matter the decade, there was/is always some type of braided hairstyle for girls that trends. And with each passing month, more and more new braided styles keep showing up and taking the world by storm. This is probably because braids are practical yet stylish hairstyles that allow you to work without your hair getting in the way. As you keep practicing these weaves, they become easier to achieve. They also keep you protected from damage and everyday pollution and dirt. Also, let’s not forget that braids are a great hairstyle to wear on those greasy hair days when you do not have time to wash your tresses.
Frequently Asked Questions
What are lemonade braids?
Lemonade braids are a protective hairstyle with side-swept cornrows. They got the name after Beyonce launched her album “Lemonade” and sported the style on its cover.
What is a butterfly braid?
A butterfly braid includes two side braids feeding into one large braid at the back of the wearer’s head.
What is a waterfall braid?
In a waterfall braid, you braid one part of the hair and leave the rest to cascade down, looking like a waterfall. It is a half-French braid.
Do braids damage hair?
If the hair is pulled tightly into the braid, you may experience hair breakage. Therefore, ensure that you follow a strict hair care regimen.
Can short hair be braided?
Yes, short hair can be braided. Micro braids are ideal for short hair. They are tiny and single braids.
Why are braids put in hot water?
Braids are put in hot water to seal the ends together.


