20 Braids For Little Girls
Take hints from the stunning hairstyle ideas and make your angle locks look edgy and stylish.

When you are a mom to a little girl, it is 50% angelic smiles and 50% little monster antics. But you can’t deny that the best part of your day is when you comb your princess’ hair, telling her stories as you brush out the tangles and weave cute braids for your little girl. Yes, styling braids for little girls and the glee they feel when they look at them— oh, it is a magical experience. That is a memory that will stick with you forever. So to keep it going, we have curated a list of adorable braids to try out on your angel’s tresses. Scroll down to check them all out!
20 Cutest Braids For Kids
1. Twisted Braid Ponytail

Image: Source
When it comes to hairstyles for school, you can never go wrong with a simple ponytail. Add a bit of delicate prettiness to this practical style by twisting an accent braid around it to fancy things up a bit.
What You Need
- Hair brush
- Hair elastics
How To Style
- Brush out all the knots and tangles from your princess’ hair and tie it in a high ponytail.
- Pick up a 3-inch section of hair from the braid and simply braid it right till the end.
- Secure the end of the braid with a hair elastic.
- Twist the braid around her ponytail 3 or 4 times.
- Remove the hair elastic from the end of the braid.
- Tie the end of the braid and the ponytail together with a hair elastic to finish off the look.
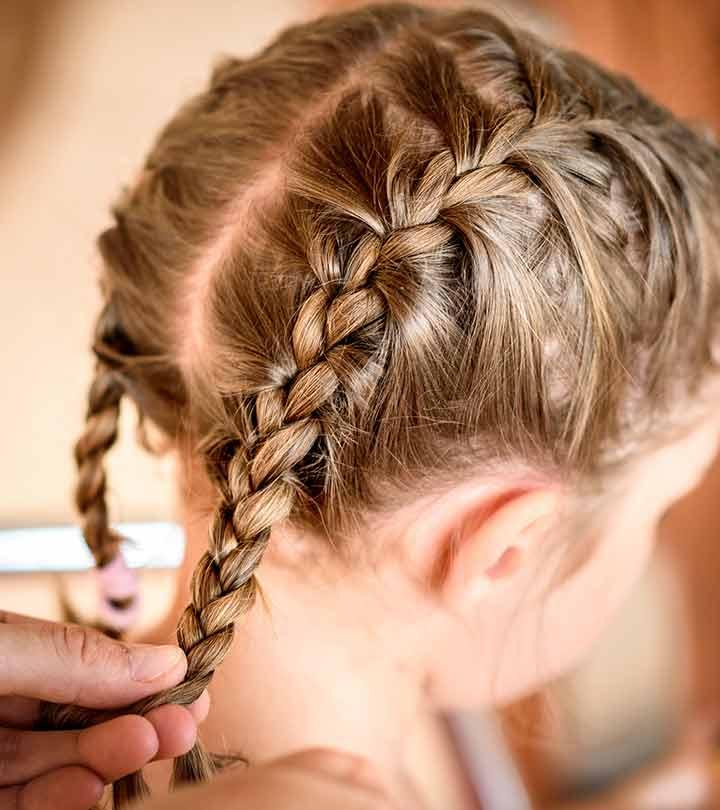
2. Half Up Crown Braid

Image: Source
Braiding your daughter’s hair does not mean just tying up her hair in a tight and severe style. You can experiment with the positioning of the braid to create new looks. Here’s a half up-half down braided style that she will look absolutely angelic in!
What You Need
- Hair brush
- Texturizing spray
- Bobby pins
What You Need
- Brush out all the knots and tangles from your little one’s hair.
- Spritz on some texturizing spray.
- Part her hair on one side.
- From the side of the parting with more hair, pick up 3 one inch sections of hair.
- Start French braiding these 3 sections towards the back of her head by adding more hair into the braid from the top side of her head (above the braid) with each subsequent stitch of the braid.
- Continue the French braid around the circumference of her head.
- Once the braid has reached near the forehead on the opposite side, secure it in place with the help of bobby pins.
- Loosen the braid to give it more volume and finish off the look.
3. Crown Of Braids

Image: Source
Of course, you know that you daughter is a little princess. Now, show the same to the world by dressing her up in a crown. Making her wear an actual gold crown could be a little much though. So, take a subtler route and go for these gorgeous crown of braids for kids instead.
What You Need
- Texturizing spray
- Hair elastics
How To Style
- Part your kid’s hair down the middle.
- Create a horizontal parting from right behind her ears to separate the front hair from the back.
- Tie 2 ponytails on either side with this front hair.
- On the right ponytail, create a gap in the hair above the hair elastic with your fingers.
- Flip ponytail cup and into this gap to topsy tail it.
- Repeat steps 4 and 5 on the right ponytail.
- Simply braid both your ponytails right till the end and secure the ends with hair elastics.
- With your braids, tie a single knot at the back of your head as you would with shoelaces.
- Flip the end of the right braid over the left braid and secure it with bobby pins on the opposite side.
- Repeat the previous step with the left braid to finish off the look.
4. Knotted Braids

Image: Instagram
French braid, Dutch braid, fishtail braid…we’ve all heard of these common types of braids. So here’s a new braided style that will take your breath away! These knotted braids look unique and are super functional as they don’t loosen or unravel through the day! Perfect for a long day at school.
What You Need
- Texturizing spray
- Hair elastics
How To Style
- Spritz on some texturizing spray all over your little one’s hair.
- Part hair down the middle and vertically divide her hair into 2 sections.
- Right from the front of the left section, pick up a 2 inch section of hair and split it into 2 sections.
- Tie a single knot with the 2 sections as you would with shoelaces, pulling it tight until it is resting against her scalp.
- Add a 1 inch sections of hair to the tails of the knot and keep repeating step 4 until the knotted braid has reached the nape of her neck.
- Secure the knotted braid with a hair elastic.
- Repeat steps 3 to 6 to finish off the look.
5. Inverted Hearts Braided Ponytail

Image: Source
Bust out that full pack of hair elastics because here’s a hairstyle that you’ll definitely want to try on your little cutie. This pull-through braid style is super easy to do and looks oh-so-cute with its inverted hearts effect.
What You Need
- Hair brush
- Hair elastics
- Hair bow
How To Style
- Brush out all the knots and tangles from your little girl’s hair and tie it into a high ponytail.
- Horizontally divide your ponytail into 2 sections so that you end up with one top and one bottom section.
- Split the top section into 2 parts.
- Flip both parts of the top section under the bottom section and tie them back together with a hair elastic.
- Now your bottom section has become your top section.
- Keep repeating steps 3 to 5 until you have reached the end of your braided ponytail.
- Tug apart your braid to loosen it up and add more dimension to it.
- Pin your bow at the base of your ponytail to finish off the look.
6. Ribboned Up Milkmaid Braids

Image: Source
Is your little lady super into athletics? Does doing her hair before any sports meet put you in a state of frenzy? Well, here’s a hairstyle you will definitely love then. These milkmaid braids will make her look adorable and keep her hair out of her face.
What You Need
- Ribbons (1/2 inch wide)
- Hair elastics
- Bobby pins
How To Style
- Part your little one’s hair on one side.
- Cut two ribbons, both being twice the length of her hair.
- Vertically divide her hair into 2 sections, one on either side of her face.
- Tie the left section of her hair into a low side ponytail with the help of the ribbon.
- Combine the two ends of the ribbons with her hair and divide her ponytail into 3 strands.
- Simply braid the ponytail right till the ends and secure with a hair elastic.
- Repeat steps 4 to 6 on the right side.
- Place your left braid across the top of your head and pin it near your right ear.
- Repeat the previous step with your right braid.
- Take a short ribbon, place it around both your braids on the left side of your head and tie a bow around them.
- Repeat the same on the right side to finish off the look.
7. Braided Buns

Image: Source
Oh how you wish your little girl would stay little forever! Well, these braided buns are just the thing you need to make her look like the innocent angel that she is. They will keep her hair neatly out of her face and have a childlike innocence of their own.
What You Need
- Hair elastics
- Bobby pins
- Hair bows
How To Style
- Part your princess’ hair down the middle and vertically divide her hair into 2 sections.
- Tie a ponytail on each side with all the hair in the 2 sections.
- Divide your left ponytail into 2 sections.
- Twist and intertwine the 2 sections with each other right till the end and secure with a hair elastic.
- Repeat steps 3 and 4 on your right ponytail.
- Roll the ponytails into buns and secure them to her head with some bobby pins to finish off the look.
8. Side Triple Flower Braids

Image: Instagram
Is there anything more exciting your cutie being chosen to be the flower girl at a wedding? I think not! Here’s a gorgeous flower braids for kids that will go beautifully with her fancy little dress.
What You Need
- Texturizing spray
- Hair elastics
- Bobby pins
- Light hold hairspray
How To Style
- Part your little girl’s hair down the middle.
- Pick up a 2 inch section of hair from above her ear (on whichever side you prefer) and divide it into 3 strands.
- Simply braid this section right till the end and secure the end with a hair elastic.
- Pancake just one side of this braid.
- Starting from the end, roll the braid into a flower up to the roots and secure it to her head with some bobby pins.
- Repeat steps 2 to 5 on two more sections of hair picked up from right next to the first flower braid.
- Spritz on some light hold hairspray to finish off the look.
9. Fishtail Accented Ponytail

Image: Instagram
It’s amazing how many great hairstyles you can come up with by just playing around with your daughter’s hair! This cool hairstyle involves an interesting placement of a fishtail accent over your little one’s ponytail. Perfect for a day of school and activities during the warmer seasons.
What You Need
- Hair elastics
- Bobby pins
How To Style
- From the center of her forehead, pick up a 4 inch section of hair and tie it up with a hair elastic.
- Divide this ponytail into 2 sections.
- Fishtail braid these 2 sections by alternately picking up a thin section of hair from the outer side of one section and adding it to the inner side of the other section.
- Secure the end of the fishtail braid with a hair elastic.
- Leaving the fishtail braid aside, tie all her hair into a mid-level ponytail.
- Pick up a thin section of hair from her ponytail and wrap it around the base of her ponytail to hide the hair elastic from view.
- Place the fishtail braid on top of her ponytail and pin it at the base of her ponytail to finish off the look.
10. Viking Braids

Image: Instagram
Halloween can be a stressful time for mommies, what with all the costume planning and shopping for candy for trick-o-treating. So here’s hairstyle idea that would go perfectly with a warrior princess outfit! These messy Viking braids look cute and edgy, at the same time.
What You Need
- Hair crimper
- Rat tail comb
- Sectioning clips
- Texturizing spray
- Hair gel
- Hair brush
- Light hold hairspray
How To Style
- Crimp your little one’s hair with the help of a hair crimper.
- With a rat tail comb, create two vertical partitions in her hair to divide it into 3 equal sections. Clip up two of them.
- From the left section, from right near the forehead, pick up a small chunk of hair and divide it into 3 equal sections.
- Spritz on texturizing spray all over her hair to give it some hold.
- Rub some hair gel between your fingers to smoothen down flyaways and set the braids in place.
- Dutch braid these 3 sections of hair by flipping the side section under the middle section and adding more hair into the braid (only add hair from the section of hair you are working with) with each subsequent stitch of the braid.
- Once your Dutch braid has gone past your ear, simply leave it loose.
- Repeat steps 3 to 7 on the other 2 sections of hair.
- Run a hair brush through the loose hair at the bottom.
- Spray on some hairspray to prevent the braids from unraveling through the day.
11. Bow French Braid

Image: Instagram
A single French braid is a classic style that you can never go wrong with. However, it can be quite a boring style for your little one. Jazz it up for her by accessorizing it with a cutesy bow to complete her fairy princess look.
What You Need
- Hair brush
- Rat tail comb
- Hair elastic
- Hair bow
How To Style
- Brush back all your princess’ hair.
- Pick up a 2 inch section of hair from the center of her forehead and divide it into 3 sections.
- French braid these 3 sections by adding more hair into the braid with each subsequent stitch of the braid with the help of a rat tail comb.
- Once you have run out of hair to add, simply braid right till the end and secure with a hair elastic.
- Pin the hair bow at the back of her head to finish off the look.
12. Nautical Dutch Braid

Image: Instagram
Imagine this – your little girl in a cute sailor outfit. Ahhh, how sweet is that?! Now, add this hairstyle to the mix and you’ve got the most adorable nautical look on your hands. All you need is a Dutch braid and a hair bow to achieve this look.
What You Need
- Hair elastic
- Hair bow
How To Style
- Part your little lady’s hair down the middle.
- From about 2 inches in, section away her hair all along her hairline at the front.
- Pick up a 2 inch section of hair at the front and divide it into 3 sections.
- Dutch braid these 3 sections by flipping the side sections under the middle section and adding more hair into the braid with each stitch.
- Once your Dutch braid has reached the back of your head, simply braid it the rest of the way down.
- Comb back the sectioned away hair and tie all of your hair (braid included) into a low ponytail.
- Attach your hair bow to the base of your ponytail to finish off the look.
13. Infinity Fishtail Braid

Image: Instagram
Thought you’d seen all the kinds of braids you could’ve seen in this lifetime? Well, think again. The infinity braid is kind of the hottest trending braid right now. And for a good reason – it looks so cool! It’s the perfect braid for your daughter if she’s super into sports.
What You Need
- Spray water bottle
- Hair elastic
How To Style
- Wet your little girl’s hair by spraying water all over it.
- Comb back all her hair.
- Pick up all the hair on top of her head, from between her temples.
- Divide that hair into two equal sections.
- Now, pick up a thin section of her from the front on the left side.
- Flip this thin section under the left section and over the right section. Do not let go of this thin section.
- Pick up another thin section of hair from the right side and combine it with the first thin section.
- Now, flip these combined thin sections under the right section and over the left section.
- Keep repeating steps 5 to 8 until your infinity braid has reached the nape of your neck.
- Then, redivide your hair into just 2 sections.
- Fishtail braid these two sections by alternately picking up a thin section of hair from the outer side of one section and adding it to the inner side of the other section.
- Once your fishtail has reached the end of your hair, secure it with a hair elastic.
- Tug and loosen the braid to add more dimension to it and finish off the look.
14. Fluffy Fishtail Braid

Image: Instagram
Now, here’s a fresh look at the classic braided ponytail style that your little one will absolutely adore. The fluffy top half of the fishtail gives it some great texture without being too over the top. This is one of the best braid hairstyles for kids that will look super cute with a pair of jeans and t-shirt.
What You Need
- Fine toothed comb
- Teasing brush
- Hair elastics
- Small hair bow
How To Style
- Back comb all your little girl’s hair and tie it into a high ponytail.
- Tease the top half of the ponytail.
- Smoothen down the front section of your teased ponytail to give it a neater look.
- From about a third of the way down its length, divide your ponytail into 2 sections.
- Fishtail braid these two sections by alternately picking up a thin section of hair from the outside of one section and adding it to the inside of the other section.
- Fishtail braid till the end of her ponytail and secure it with a hair elastic.
- Attach a small hair bow at the end of her braided ponytail to finish off the look.
15. Dorothy Braids

Image: Instagram
Who doesn’t love The Wizard Of Oz? Dorothy with her checkered blue dress, red shoes, and pigtail braids is the epitome of cuteness. These Dorothy inspired braids for girls are perfect for a day at school or even a playdate.
What You Need
- Hair elastics
- Red ribbons
How To Style
- Part your little girl’s hair down the middle and vertically divide her hair into 2 sections.
- From the left section, from right near the parting, pick up a small section of hair and start twisting it.
- As you are twisting it, keep adding more hair to it from along the hairline.
- Keep twisting the hair until you have gone past your ear.
- Now, divide all your leftover section hair into 3 equal parts and simply braid it right till the end.
- Secure the end with a hair elastic.
- Repeat steps 2 to 6 on the right section of your hair.
- Tug apart and loosen the braids to finish off the look.
16. Bubble Braid

Image: Instagram
I’m sure you have days when you sleep through the alarm and then rush to get your kid ready for school. Doing an intricate braid at that point sounds absolutely ridiculous. This bubble braided style can be done in the 5 minutes you have left before her school bus arrives!
What You Need
- Fine toothed comb
- Hair elastics
- Bobby pins
How To Style
- Comb back all of your little lady’s hair.
- Pick up half of her hair and tie it into a ponytail.
- Take a thin section of hair from the ponytail and wrap and pin it around its base to hide it from view.
- Take half of the loose hair at the bottom, combine it with the half ponytail, and secure it with a hair elastic.
- Bubble your half ponytail by pulling it up and loose from between the hair elastics.
- Repeat step 3.
- Now take all of your hair and tie it into a low ponytail.
- Repeat steps 5 and 6.
- Divide your ponytail into 2 sections.
- Fishtail braid it by alternately picking up a thin section of hair from the outer side of one section and adding it to the inner side of the other section.
- Fishtail braid till the end and secure with a hair elastic.
- Wrap and pin a thin section of hair around the hair elastic to conceal it and finish off the look.
17. French Micro Braids

Image: Instagram
Why go for just one or two braids when you can go for so many?! Here’s a winter style that your daughter can rock when she’s out playing with her friends. These micro braids will keep her hair all neatly tied up while still looking oh-so-chic.
What You Need
- Texturizing spray
- Rat tail comb
- Hair elastics
How To Style
- Spray texturizing spray all over your little girl’s hair.
- Part her hair down the middle with the help of a rat tail comb.
- Continue the parting down till the nape of her neck to divide her hair vertically into 2 sections.
- Pick up a 3 inch section of hair right from the front of the left section and split it into 3 sections.
- French braid these 3 sections by adding more hair into the braid with each subsequent stitch of the braid.
- Once the French braid has reached the nape of her neck, secure it with a hair elastic.
- Pick up a 2 inch section of hair from the tail of her braid, simply braid it right till the end and secure it with a hair elastic.
- Keep repeating the previous step until all the hair in the tail of her braid has been braided.
- Repeat steps 4 to 8 on the right section of her hair to finish off the look.
18. Accented Dutch Braid Ponytail

Image: Instagram
Thinking of hairstyles for your daughter during the holiday season can be such a drag when you have a million other things to plan. So let me take this one thing off your hands by recommending this gorgeous hairstyle for her. This intricate side Dutch braid goes down into a messy accented ponytail to create a perfect holiday look.
What You Need
- Hair elastic
- Bobby pins
- Sea salt spray
- Bejeweled hair accessories
How To Style
- Part your little one’s hair down one side.
- From the side of the parting with more hair, pick up a 3 inch section of hair from right next to the braid and split it into 3 sections.
- Dutch braid these 3 sections by flipping the side sections under the middle section and adding more hair into the braid with each stitch of braid.
- Once the Dutch braid has reached the nape of her neck, secure it with a hair elastic.
- Pick up a thin section of hair from the ponytail wrap and pin it around the hair elastic to hide it from view.
- Pick up a small chunk of hair from the ponytail and split it into 2 sections.
- Fishtail these 2 sections by alternately picking up a few strands from the outer side of one section and adding it to the inner side of the other section.
- Fishtail braid right till the end and secure with a hair elastic.
- Spray some sea salt spray all over the ponytail to give it some texture.
- Pancake your Dutch braid and fishtail to add some messy texture to them.
- Accessorize your Dutch braid with some bejeweled accessories to finish off the look.
19. Simple Dutch Braid Ponytail

Image: Instagram
Does your little princess have a big presentation coming up at school? Ooooh…or is it her middle school graduation? Whatever it may be, coming up with slightly mature and professional styles for a little girl can be a real pain. This simple Dutch braided low ponytail is exactly the style you need to get you out of this fix!
What You Need
- Hair brush
- Rat tail comb
- Hair elastic
- Bobby pins
How To Style
- Brush back all of your little one’s hair.
- With a rat tail comb, create two vertical partitions, starting from the temples till the nape of her neck to section off the hair at the center of her head.
- From the very front of this center section, pick up a 3 inch section of hair and split it into 3 parts.
- Dutch braid these 3 parts by flipping the side strands under the middle strand and adding more hair into the braid (pick up hair only from the center section) with each braiding stitch.
- Once the Dutch braid has reached the nape of her neck, secure all her hair in a ponytail with a hair elastic.
- Pancake the Dutch braid to make it look wider.
- Pick up a thin section of hair from the ponytail and wrap and pin it around its base to hide the hair elastic from view.
20. Mixed Braid

Image: Instagram
Can’t decide which braid to do on your daughter? How about you mix it up and do a bunch of them! This super simple braid makes good use of French twists, 3 strand braid, and fishtail braid to create a super sweet and relaxed hair look.
What You Need
Hair elastic
How To Style
- Part your little lady’s hair down the middle.
- Pick up a 2 inch section of hair from the front on the left side and split it in two.
- French twist these 2 sections by intertwining them with each other and adding more hair into the braid with each twist.
- Once the twisted braid has reached the back of her head, secure it with a hair elastic.
- Repeat steps 2 to 4 on the right side.
- Remove the hair elastics from the French twists and split all her hair into 3 sections.
- Simply braid these 3 sections till about halfway down.
- Then re-split the hair into just 2 sections.
- Fishtail braid these 2 sections by alternately picking up a few strands from the outer side of one section and adding it to the inner side of the other section.
- Once the fishtail braid has reached the end of her hair, secure it with a hair elastic.
- Loosen and pancake the braid to finish off the look.
The experience of styling your kid’s hair can be very memorable. It is not just about spending time with them, but you also want them to love the way they look. Braids are versatile and easy to experiment with, and they give you more time to spend with your little one. The 20 braids for kids mentioned above come with tutorials, so you can easily try them out on your kid. Beginning with a twisted braid and ending with a mixed braid, these weaved hairstyles are sure to make your girl look pretty. And if they participate in after-school activities, it will keep their hair out of their face. As you keep practicing these braids on your kid’s hair, you will become a pro and can experiment with them by adding your own twist on these styles.


