10 Buns For Those With Short Hair
You can rock this popular hairstyle using some accessories and pins on your short hair.
Whoever said that short-haired women cannot bun up their hair must be crazy. Many people underestimate the allure of short hair simply because they think you can experiment with different hairstyles due to the short length. But we are here to prove them wrong with our list of 10 elegant buns for short hair! You may not be able to style your short tresses the same way as you would long hair, but that does not mean you can play around and find good updo or low bun hairstyles for your above-the-shoulders hair. Scroll down to learn how you can tie your short locks in ethereal buns! Keep reading to pick your favorite style from our list.
In This Article
Bedazzling Buns For Short Hair
- Low Voluminous Bun
- Messy Top Bun
- Quirky Faux Bun
- Messy Side Bun With A Headband
- Elegant Side Braided Bun
- Loose Side Bun
- Playful Ballerina Bun
- Simple Top Bun
- Low Rolled Bun
- Retro Twist Mini Bun
1. Low Voluminous Bun

Photo Credit: Jaguar PS / Shutterstock.com
One of the major concerns with short hair buns is the volume. But, with a good volumizing product and a little bit of teasing, you can create magic!
Products Used
- Volumizing serum
- Heat protectant spray
- Blow drier
- Teasing comb
- Hair Brush
- Strong-hold hairspray
[ Read: Bun Hairstyles For Long Hair ]
How To Style
- Apply a volumizing product of your choice to damp hair, concentrating at the roots. Spray a heat protectant spray and blow dry, using a low heat setting.
- Part your hair a little off the centre.
- Pull as much of your hair as you can into a low ponytail at the nape, and tie with a hair tie.
- Divide the ponytail into three sections and tease to add volume to each.
- Take a section, wrap it around the base of the pony and keep it in place with the help of bobby pins. Do the same with the other two sections.
- Spray a strong-hold hairspray on a hair brush and brush through to avoid wayward strands. Use a medium to strong-hold hairspray to set your hair and keep your bun from falling apart.
Is This For You?
This works best on those with an oval or a heart shaped face.
2. Messy Top Bun

Photo Credit: magicinfoto / Shutterstock.com
Extremely versatile, the messy bun can be as casual or classy as you want it to be. It is easy to recreate and perfect for just about every occasion.
Products Used
- Texturizing spray
- Teasing comb
How To Style
- Apply a texturizing spray to your hair and scrunch gently.
- Run your fingers through your hair to comb and pull as much of it as you can into a ponytail at the crown. Make sure that you do not use a brush or a comb because the less structured your hair looks, the better it is. If the hair tie cannot hold up all your hair, that’s fine. Loose tendrils work in favor of this hairstyle.
- Divide the ponytail into two sections, and, using a teasing comb, add volume to them. Hide the teased portion by smoothing out the top layer.
- Wrap one section around the base of the ponytail, and secure it in place with the help of bobby pins. Then, wrap the other section around the first – but in the opposite direction – and pin. To keep the bobby pins from falling off, coat them with hairspray before using them to secure your bun.
Is This For You?
This works for all face shapes. But those with wider faces should consider adding more volume.
3. Quirky Faux Bun

Photo Credit: Helga Esteb / Shutterstock.com
Products Used
- Pomade
How To Style
- Start by applying a volumizing product to your hair.
- Gather your hair at one side, close to the temple. Secure with a hair tie, and use bobby pins around the ponytail to keep the shorter strands in place.
- This hairstyle requires the use of pomade. So, to spread it through your hair evenly, spray some water on the ponytail.
- Take a small amount of pomade between your palms and spread it through the length of the pony. Curl your hair towards the base of the ponytail, so that the resulting shape resembles a bun. Use a little more pomade to smoothen the rest of your hair.
- Allow the pomade to set, and cut off the hair tie.
Is This For You?
This looks best on those with long faces.
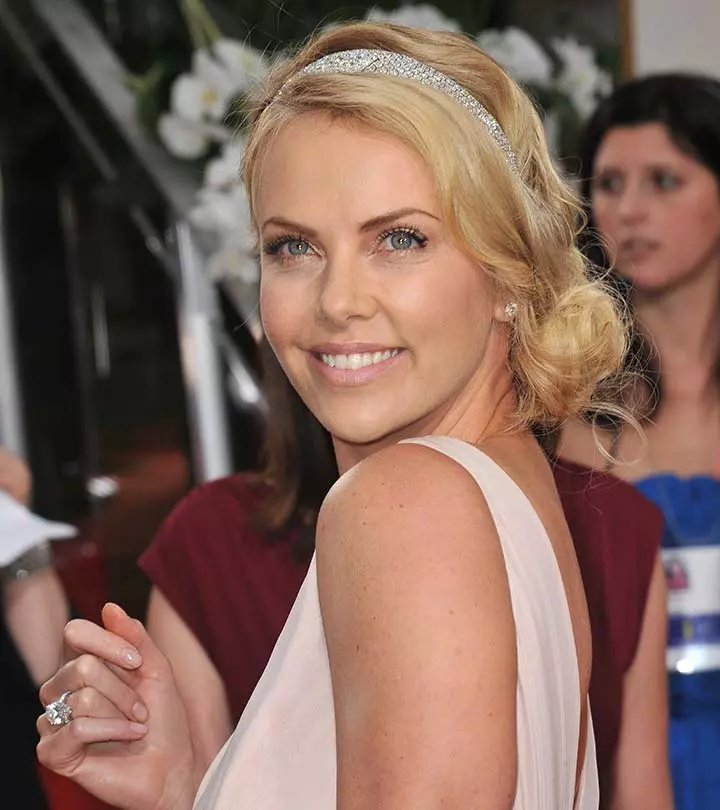
4. Messy Side Bun With A Headband

Photo Credit: s_bukley / Shutterstock.com
Gone are the days when headbands were the accessories of little girls. From trendy to classy, the new generation of headbands can amp up any look. Sport one with this side bun to make this adorable hairstyle look even more adorable.
Products Used
- Smoothening serum
- Heat protectant spray
- Medium barrel curler
- A headband
[ Read: Messy Bun Hairstyles ]
How To Style
- Apply a smoothening serum to your hair. Spray a heat protectant spray on your hair.
- Part your hair to one side. Starting at the bigger part, curl your hair away from your face using a medium barrel curler.
- Gently brush through each curled section, to make it a little less structured.
- Divide the hair into three sections. Gather all the strands from the middle section to the side of the larger part, and twist it into a low bun. Use bobby pins to keep the bun in place.
- Start braiding the hair from the smaller part, incorporating strands as you move along. Tuck the braid into the bun.
- Pull back the hair from the bigger part, wrap it around the base of the bun and pin it in place. The overall style leans more towards the casual, so it is okay if a few tendrils escape.
- Place a headband at your crown to finish the look.
Is This For You?
This hairstyle works well for those with an oval or a heart-shaped face.
5. Elegant Side Braided Bun

Photo Credit: Everett Collection / Shutterstock.com
It might be hard to believe but this sleek hairdo requires no heat and minimal products.
Products Used
- Texturizing mousse
- Hairspray
How To Style
- Part your hair to one side, and apply a texturizing mousse to it.
- Starting at the smaller part, right above the ear, begin braiding your hair. Incorporate more and more pieces as you move along. The braid should rest at the nape.
- As you get to the side of the larger part, slip strands from the top into the braid as well.
- Braid through the rest of your hair and secure with an elastic band. Spray the braid with hairspray to keep the shorter strands from slipping out.
- Roll the braid into itself to make a bun and secure with bobby pins.
Is This For You?
This hairstyle works best on those who have a long face.
6. Loose Side Bun

Photo Credit: Featureflash / Shutterstock.com
Popular and glamorous, this loose side bun couldn’t be easier to style.
Products Used
- Volumizing product
- Heat protectant spray
- Flat iron
- Teasing comb
- Hairspray
How To Style
- Apply a volumizing product to your hair. Spray with a heat protectant before you style.
- The top needs to be smooth and polished, so run a flat iron through your hair. Straighten from the roots till the point above your ear. Then, using the same flat iron, style loose curls from that point onwards.
- Leaving out the front portion, tie your hair into a low side ponytail.
- Backcomb the pony with a teasing comb to add volume, and tuck the end into the elastic at the base. Secure with bobby pins and set with a hairspray.
Is This For You?
This hairstyle works for everybody.
7. Playful Ballerina Bun

Photo Credit: Featureflash / Shutterstock.com
For those who are fans of the messy look, here, the classic ballerina bun has been revamped to a softer, more wearable style.
Products Used
- Texturizing spray
- Conditioning serum
- Flexible-hold hairspray
How To Style
- Start with spraying your roots with a texturizing spray. Apply a conditioning serum to the rest of your hair to add shine. Finger-comb your hair. Make sure that you do not use a comb or a brush.
- Gather your hair on the top of your head and secure it with an elastic band. The ponytail should not be too tight.
- Divide the pony into three sections.
- Take a section, twist it gently, place the ends close to the base of the pony, and secure with bobby pins. Do the same with the other sections.
- Set the bun with a flexible-hold hairspray.
Is This For You?
This bun for short hair looks best on those with an oval or a heart shaped face.
8. Simple Top Bun

Photo Credit: MatteoChinellato / Shutterstock.com
Simple yet sophisticated, this is the perfect way to take an ordinary bun to the next level.
Products Used
- Volumizing product
- Blow dryer
- Teasing comb
- Hairspray
How To Style
- Apply a volumizing product to damp hair. Flip your hair upside-down, and blow dry to add more volume.
- Gather your hair into a high ponytail and secure with an elastic band.
- Divide the ponytail into two sections. Then, backcomb both sections to add volume. Smooth out the sections but make sure that it stays fluffy.
- Wrap the first section around the base of the pony. Then wrap the second section around the first, in the same direction.
- Secure the bun with bobby pins and set with a hairspray.
Is This For You?
This works best for petite faces.
[ Read: Chignon Buns You Can Try ]
9. Low Rolled Bun

Photo Credit: s_bukley / Shutterstock.com
Elegance doesn’t have to be difficult or time consuming, for this bun won’t take you more than five minutes to make.
Products Used
- Smoothening serum
- Hairspray
How To Style
- Apply a smoothening serum to your hair and brush it out.
- Split your hair into two sections.
- Twist each section and tie with an elastic band to make a ponytail.
- Fold the ponytail, and wrap it around the elastic to make a bun.
- Secure the bun with bobby pins, and set it with a medium-hold hairspray.
Is This For You?
This works for all face shapes.
10. Retro Twist Mini Bun

Photo Credit: Shutterstock

Photo Credit: Shutterstock
The flair of the retro and the sophistication of the modern, this hairstyle strikes the perfect balance.
Products Used
- Conditioning serum
- Heat protectant spray
- Medium barrel curler
- Medium-hold hairspray
[ Read: How To Do A Donut Bun ]
How To Style
- Apply a conditioning serum to your hair for smoothness and shine.
- Part your hair off to one side. Spray a heat protectant. Using a medium barrel curler, start curling your hair. Begin from the larger part, and curl away from your face. Run your fingers through your hair to separate the curls.
- Beginning from the point above your ear, braid a loose rope braid. Keep incorporating more and more pieces as you move along.
- Fashion a mini bun at your nape, and tuck the end of the braid into it.
- Secure the braid and the bun with bobby pins and set with a medium-hold hairspray.
Is This For You?
This retro inspired hairstyle suits everyone.
Just because your hair is short does not mean you can try out elegant hairstyles like buns. From low buns to high buns and even a faux bun, these bunned hairstyles are versatile and easy to achieve. You can try these hairstyles irrespective of your hair type and texture. And you can have a little fun by pairing these buns for short hair with cool jewelry or hair accessories. Follow these DIY bun hairstyle tutorials carefully, so you do not go wrong anywhere. And remember always to spritz your hairdo with some hairspray to keep it intact for a longer time.


