50 Best Indian Hairstyles You Must Try In 2022
An ornate braid or leaving your curls loose - there's an elegant hairdo for everyone here.

It is no surprise that many Indian women have won titles such as Miss Universe, Miss World, and Miss Earth. Indian women have it all – the brains, the looks, and the hair! And today, we show you how to style your tresses in the best Indian hairstyles. These hairstyles are intricately woven masterpieces that make everyone stop and stare. From curls to braids, Indian hairstyles are very versatile and beautiful. So, no matter your face shape, you can always look stunning in them. Keep reading to check out these divine Indian hairstyles to flaunt on any occasion!
50 Exquisite Indian Hairstyles For Women
- Zari French Braid
- Diffused Curls
- Ringlet Bun With Gajra
- Elegant Twisted Bun
- Windswept Waves
- Triple Twisted Ringlet Bun
- Pinned Back Twisted Ropes
- Chotli Braid
- Bumped Up Curls
- Vertical Low Bun
- Curled Edges
- Gajra Entwined Braid
- Royal Curls
- Diffused Curls With Headband
- The Sleek/Messy Ponytail
- Pinned Back Sultry Curls
- Daisy Braid
- Jasmine Fishtail Braid
- Double French Braid Ponytail
- Messy Pulled Back Curls
- Accessorized Fishtail Braid
- Sea Salt Braid
- Floral Ringlet Bun
- Floral Curls
- Half Up Beehive
- Classic Fishtail Braid
- Messy Pulled Back Fishtail Braid
- Twisted Bangs With Fishtail Braid
- Inverted French Braid Bun
- Bejeweled Pulled Back Braids
- Gold Caged Braid
- Loose Braid With Voluminous Bangs
- Curls With A Floral Centerpiece
- French Twisted Messy Bun
- Sea Salt Curls
- Messy Ponytail
- Twisted Back Waves
- Multi Braid Ponytail
- Hippie Half Bun
- Braided Tiara With Curls
- Red Rose Bun
- Messy Double Bun
- Mermaid French Braids
- Messy Pulled Back Curls
- Curls With A Bejeweled Headband
- Bumped Up Maang Teeka
- Triple Fishtail Braid
- Half Bun/Half Braid
- Floral Mixed Braid
- Pearls Entwined Braid
1. Zari French Braid

Image: Instagram
Of course, topping this list is our very own international style icon, Sonam Kapoor. Sonam shows us how adding something as simple as a gold thread can escalate your regular same old French braid to a whole new level.
What You Need
- A fine toothed comb
- Heat protectant serum
- Hair straightener
- Texturizing spray
- Hair elastics
- Gold zari thread
- Light hold hairspray
How To Style
- Prep your hair by washing it. Dry it out and apply some heat protectant and texturizing spray.
- Picking up 2 inch sections at a time, straighten all your hair.
- Now, French braid your hair by adding a section of hair to your main braid with each successive twist as you go down the length of your hair.
- Braid right till the very ends of your hair and secure the braid with a tiny hair elastic.
- From about three inches of the end of your hair, start wrapping the gold zari thread tightly around your braid until you reach the end of it.
- Double knot the thread to secure it in place.
- Finish off the look by pulling out a few pieces of hair to mess up your braid and spraying on some light hold hairspray.
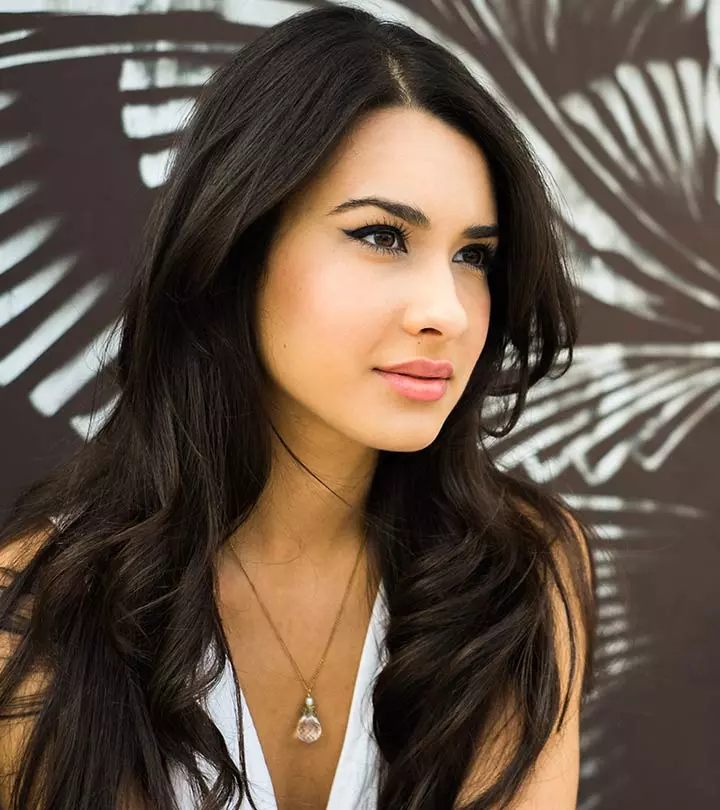
2. Diffused Curls

Image: Instagram
I know that sometimes we just wish we could have beautiful, poker straight hair. But trust me on this, do embrace your curls in all their glory. And to get better defined curls, use a hair diffuser attached to your blowdryer. It will change your life.
What You Need
- Wide toothed comb
- Volumizing mousse
- Blowdryer with diffuser attachment
- Small claw clip
- Smoothening serum
- Medium hold hairspray
How To Style
- With the help of a wide toothed comb, untangle all the knots from your washed, wet hair.
- Apply a dollop of volumizing mousse throughout your hair.
- With the diffuser attached, blowdry your hair until it has dried about 90%.
- From the center of your forehead, pull back about a 5 inch section of hair and pin it at the back of your head using a small claw clip.
- Finish off with smoothening serum to get rid of any frizz and a few spritzes of medium hold hairspray.
3. Ringlet Bun With Gajra

Image: Instagram
Now this is a look fit for a traditional Indian wedding. Gajras (jasmine garlands) have been used as a hair accessory by Indian women since time immemorial. They are the perfect accessory to complete an intricate hairdo.
What You Need
- Round brush
- Blowdryer
- Texturizing spray
- Hair elastics
- Hair donut (medium sized)
- Bobby pins
- Gajra (garland made of jasmine flowers)
- Strong hold hairspray
How To Style
- Blowdry your hair with the help of a round brush to get relatively straight hair.
- Prep your hair with lots of texturizing spray.
- Divide your hair horizontally (from ear to ear) into two sections and separate them with 2 hair elastics so that you end up with 2 ponytails on top of each other.
- On the lower ponytail, insert the hair donut.
- From the top ponytail, pick up a 1 inch section of hair, roll it into a ringlet, and secure it onto the hair donut using bobby pins.
- Repeat this process until all the hair from both the ponytails ha been rolled and pinned up to the donut in a manner that covers and hides the donut completely.
- Use loads of strong hold hairspray to ensure the rolled up ringlets do not unravel.
- Finish off by wrapping the gajra around the perimeter of your updo and securing it in place with the help of bobby pins.
4. Elegant Twisted Bun

Image: Instagram
This elegant look is quite multipurpose as it is perfect for a formal event as well as a family function. Hence, you can attend an office meeting in the morning and make your way to your friend’s wedding in the evening, without having to change your hair!
What You Need
- Texturizing spray
- Hair elastics
- Bobby pins
- Smoothening serum
- Strong hold hairspray
How To Style
- Prep your washed, dried hair with a texturizing spray.
- Part your hair down the middle and from about 2 inches in, section away all the hair along your hairline.
- Tie up the rest of your hair at the nape of your neck using a hair elastic.
- Divide the ponytail into 2 sections.
- Twist both the sections until their very ends and then intertwine the twisted sections with each other.
- Roll the intertwined sections of hair into a bun and secure it at the nape of your neck by pushing bobby pins into the bun, all around its circumference.
- Now, pick up the hair sectioned away on the left side of your face, twist it up completely, and pin it back near the nape of your neck, under the bun. Repeat the same on the other side.
- Finish off the look with some smoothening serum and strong hold hairspray.
5. Windswept Waves

Image: Shutterstock
Now this look does not require any frills and fancies. It simply takes your natural hair and gives it that windswept look that conveys a sense of free spiritedness and a carefree attitude. Well, as much free spirit and carefree attitude your hair is capable of conveying!
What You Need
- Heat protectant serum/spray
- Volumizing mousse
- 2 inch curling iron
- Paddle brush
How To Style
- Prep your washed and dried hair with some heat protectant and volumizing mousse.
- Using a 2 inch curling iron, curl all your hair, making sure that you always rotate the brush away from your face.
- Finish off by gently brushing out all the curls and brushing all your hair back to give it a wind-swept look.
6. Triple Twisted Ringlet Bun

Image: Instagram
So you have been looking forward to a wedding in your family and you want to look absolutely perfect for it? We have got you covered! This twisted updo may require a bit of skill but it will definitely be worth it in the end.
What You Need
- Texturizing spray
- Sectioning clips
- Fine toothed comb
- Tail comb
- A bumpit (medium sized)
- Hair elastics
- Bobby pins
- Strong hold hairspray
How To Style
- Prep your washed, dried hair with some texturizing spray.
- Section off all the hair on the front of your head, from ear to ear, using sectioning clips.
- Insert a bumpit under the hair at the back and smoothen hair over it with the help of a fine toothed comb to hide it from view.
- Now, tie a ponytail with all the hair at the back.
- Remove the sectioning clips from the hair sectioned away at the front.
- With the help of a tail comb, divide the hair horizontally (from ear to ear) into 3 parts.
- From the section that is right at the back, pick up a 2 inch section of hair from near your right ear.
- Start French twisting that section of hair, adding more hair with each twist as you move towards the left ear.
- Once you have reached your left ear, simply twist up the remaining hair right till the end and pin it to the back of your head.
- Repeat steps 7 to 9 with the middle and front sections of hair.
- From the ponytail at the back, pick up a 2 inch section of hair, roll it into a ringlet, and secure this ringlet to your head with the help of bobby pins, making sure to keep it close to the base of the ponytail.
- Repeat the previous step until you have rolled and pinned up all the hair in the ponytail, thus ending with an updo.
- Finish off the look with a strong hold hairspray to secure the updo in place.
7. Pinned Back Twisted Ropes

Image: Instagram
This twisted look that makes strands of your hair look like a rope is seriously cute. Pair it with a cute sundress and some sneakers and you are ready for a date with that guy you’ve had a crush on for ages.
What You Need
- Texturizing spray
- Heat protectant serum/spray
- 1.5 inch curling iron
- Paddle brush
- Bobby pins
How To Style
- Prep your washed, dried hair with some heat protectant and texturizing spray.
- Picking up 2 inch sections of hair at a time, curl all your hair.
- Gently run a paddle brush through your hair to open up the curls.
- Part your hair down the middle.
- From near your right temple, pick up a 3 inch section of hair and divide it into 2 parts.
- Twist both the sections of hair separately, and then intertwine them with each other.
- Secure the twisted braid at the back of your head with some bobby pins crisscrossed over each other.
- Repeat step 4 to 6 on the other side.
- Finish off the look with a few more spritzes of texturizing spray.
8. Chotli Braid

Image: Instagram
Here comes one of the easiest hairstyles for long hair in Indian style. Beautiful chotlis like this one are a mainstay of traditional South Indian wedding accessories. And the best part of this look is that it takes literally 10 minutes to do as it just involves a simple braid and putting on a chotli.
What You Need
- Heat protectant serum/spray
- Straightening iron
- Hair elastic
- A Chotli (a long hair accessory made of metal and stones)
- Bobby pins
- Smoothening serum
How To Style
1. Prep your washed, dried hair with some heat protectant.
2. Picking up 2 inch sections at a time, straighten all your hair.
3. Part your hair in the middle and simply braid your hair, securing the ends with a hair elastic.
4. Attach the chotli at the top and bottom of your braid, using bobby pins every few inches down your braid to secure it.
5. Finish off with a smoothening serum to get rid of any frizz.
9. Bumped Up Curls

Image: Instagram
A bumpit is all you need to bump your typical boring curly look (see what I did there?) to new heights. This look is especially great to wear under a ghungat (the bridal dupatta worn over one’s head) as it prevents it from lying flat on your head and hiding all your hair.
What You Need
- Heat protectant serum/spray
- 1.5 inch curling iron
- A fine toothed comb
- A medium sized bumpit
- Bobby pins
- Strong hold hairspray
How To Style
- Prep your washed, dried hair with some heat protectant.
- Using a 1.5 inch curling iron and picking up 2 inch sections at a time, curl all your hair.
- Part your hair on any one side and from about 2 inches in, section away all the hair along your hairline.
- Insert the bumpit under the hair at the top of your head.
- Gather the hair covering the bumpit in the center and secure it with some crisscrossed bobby pins.
- Now, pick up the hair that had been sectioned away on the right side, sweep it over to the opposite side and pin it right above the left ear.
- Do the same with the hair sectioned away on the left side.
- Finish off with some strong hold hairspray to prevent the curls from unraveling throughout the day.
10. Vertical Low Bun

Image: Instagram
A maang teeka adds that extra bling to your updo that you may need for any big traditional functions. Besides, this look is well suited for women of all age groups. And come on, if this look is good enough for Kim Kardashian, it’s good enough for us.
What You Need
- Texturizing spray
- A bumpit (big sized)
- Fine toothed comb
- Hair elastic
- Bobby pins
- Smoothening serum
- A maang teeka
How To Style
- Prep your washed, dried hair with some texturizing spray.
- Leaving out your bangs, insert a bumpit under the hair right behind your bangs.
- Gather all your hair and tie it into a ponytail at the nape of your neck.
- Hold two fingers pointing upwards below the base of your ponytail.
- Wrap the ponytail around these two fingers, ending up with a vertical bun.
- Gently remove your fingers and secure this bun at the base of your neck using bobby pins.
- Use smoothening serum to get rid of any frizz.
- To finish off the look, part your bangs in the middle and put on a maang teeka.
11. Curled Edges

Image: Shutterstock
This simple look is perfect for college work, or a casual day of hanging out with friends. All you need is a round brush, a blowdryer, and 5 minutes of your time after you step out of the shower.
What You Need
- Heat protectant serum/spray
- Round brush
- Blowdryer
- Light hold hairspray
How To Style
1. Prep your washed, wet hair with some heat protectant.
2. Rolling the ends of your hair around the round brush, blowdry all your hair.
3. Part your hair on the side you prefer.
4. Finish off the look with some light hold hairspray.
12. Gajra Entwined Braid

Image: Instagram
Flower gajras are a huge part of the traditional Indian wedding look for women. This hairstyle is appropriate for the sister of the bride. This look incorporates a silver maang tikka, which complements the color of the gajra perfectly.
What You Need
- Texturizing spray
- A bumpit (small sized)
- Fine toothed comb
- Bobby pins
- Hair elastics
- A gajra
How To Style
- Prep your washed, dried hair with some texturizing spray.
- Section away a bit of hair from the front of your head on any one side.
- Start French twisting that section of hair, i.e. adding more hair with each twist as you move towards the ear.
- Once you have reached your ear, simply twist till the end of the hair and secure it with bobby pins at the back of your head.
- Now, simply braid all your hair and secure it at the end with a hair elastic.
- Attach a gajra in the shape of a bun at the top of your braid with the help of bobby pins.
- Entwine another gajra along the length of your braid and use a hair elastic to tie it to the end of your braid.
13. Royal Curls

Image: Instagram
So you have medium length hair, want to do them up in curls, and don’t want to look boring? We have a solution for you! Add a royal touch to your look by simply putting on a necklace around your forehead and feel like the queen that you are.
What You Need
- Heat protectant serum/spray
- 1.5 inch curling iron
- Bobby pins
- Smoothening serum
- A necklace
How To Style
- Prep your washed, dried hair with some heat protectant.
- Picking up 2 inch sections of hair at a time, curl all your hair using a 1.5 inch curling iron.
- Pull back all the hair from the front of your face and pin it in the center at the back of your head using bobby pins.
- Position the necklace around your forehead and pin it in place above your ears, making sure that the ends of the necklace and the pins are placed under your hair.
- Finish off with some smoothening serum to get rid of any frizz.
14. Diffused Curls With Headband

Image: Instagram
Embrace that short curly hair of yours and take it to the next level with the help of a diffuser. Add a colorful cloth headband, some kohl-lined eyes, and a nose stud to complete this look and to give off a boho-chic vibe.
What You Need
- Volumizing mousse
- Paddle brush
- Blowdryer with diffuser attachment
- A colorful cloth headband
How To Style
1. Prep your washed, wet hair with some volumizing mousse.
2. Remove all the knots and tangles from your hair using a paddle brush.
3. With the diffuser attached to your blowdryer, and your head flipped forward with your hair hanging in front of you, blowdry all your hair.
4. Finish off the look by putting on a colorful cloth headband to add a fun twist to your hair.
15. The Sleek/Messy Ponytail

Image: Instagram
Wow! This rebellious look is a perfect combination of sleek poker straight hair, and messy sea salt sprayed hair. Deepika is totally rocking it, and so can you!
What You Need
- Medium hold hair gel
- Fine toothed comb
- Hair elastic
- Sea salt spray
How To Style
1. Part your hair down the middle.
2. Apply some hair gel to the hair on top of your head.
3. Use a fine toothed comb to make the hair on top of your head lie as flat as possible.
4. Tie all your hair into a ponytail at the back of your head.
5. Finish off the look by spritzing on some sea salt spray to your ponytail and scrunching it up with your hands.
16. Pinned Back Sultry Curls

Image: Instagram
This hair down, curly look is perfect for an evening out (a date, maybe?). This sexy look perfectly combines straight and curly hair in a way that looks effortless and beautiful at the same time.
What You Need
- Heat protectant serum/spray
- Straightening iron
- 1 inch curling iron
- Bobby pins
- Smoothening serum
- Light hold hairspray
How To Style
1. Prep your washed, dried hair with some heat protectant.
2. Picking up 2 inch sections of hair at a time, straighten all your hair.
3. Now, picking up 1 inch sections at a time, curl only the ends of your hair.
4. Part your hair and pin it back on one side using bobby pins.
5. Finish off the look with some smoothening serum and a few spritzes of light hold hairspray.
17. Daisy Braid

Image: Instagram
This cutesy look is perfect for a picnic with friends. The twisted hair keeps hair out of your face and the simple braid gives off a relaxed, easy going vibe. The flowers just make you look cute.
What You Need
- Texturizing spray
- Bobby pins
- Hair elastic
- Small fresh flowers
How To Style
- Prep your washed, dried hair with some texturizing spray.
- Part your hair down the middle.
- Leaving out your bangs, pick up all the hair from the front of your face on the left side.
- Twist up this section of hair and pin it at the back of your head with some bobby pins criss-crossed over each other.
- Repeat the previous steps on the right side.
- Now, simply braid all of your hair and secure it at the end with a hair elastic.
- Loosen the braid a little to make it wider and to give it a softer look.
- Insert some fresh flowers all along your braid and secure them in place with the help of some bobby pins.
18. Jasmine Fishtail Braid

Image: Instagram
If you are looking for simple Indian hairstyles for long hair, then let me tell you that your search ends here. Trust Karisma Kapoor to take a simple fishtail braid and make it an object of envy! On top of that, she has deconstructed the gajra and simply added individual jasmine flowers to her braid to give it her own unique twist.
What You Need
- Texturizing spray
- Hair elastics
- Jasmine flowers (with long stems)
- Light hold hairspray
How To Style
- Prep your washed, dried hair with some texturizing spray.
- Flip all your hair over your shoulder on any one side and tie it in a ponytail.
- Now, divide your ponytail into 2 sections and fishtail braid it.
- To make a fishtail braid, pick up a thin section of hair from the outer side of the right section and add it to the inner side of the left section.
- Next, pick up a thin section of hair from the outer side of the left section and add it to the inner side of the right section.
- Repeat the previous two steps alternately until you reach the end of your hair and secure the braid with a hair elastic.
- Now, cut off the hair elastic at the top of your braid.
- Insert some jasmine flowers all along the length of your braid and finish off with a few spritzes of light hold hairspray.
19. Double French Braid Ponytail

Image: Instagram
This double French braided ponytail is immensely multifunctional and versatile because you can wear it for a formal occasion, a casual day out, or even for working out! No matter what the activity or occasion, this look will always make you look cute.
What You Need
- Texturizing spray
- Bobby pins
- Hair elastics
- Sea salt spray
How To Style
- Prep your washed, dried hair with some texturizing spray.
- Part your hair slightly off center.
- On the left side of your parting, pick up a 3 inch section of hair and start French braiding.
- Once you have reached the back of your head, secure the French braid with bobby pins.
- Repeat steps 3 and 4 on the other side.
- Gather all your hair into a ponytail at the back of your head, remove the bobby pins holding the French braids, and tie the ponytail with a hair elastic.
- Finish off the look by spritzing on some sea salt spray to your ponytail and scrunching it up with your hands.
20. Messy Pulled Back Curls

Image: Instagram
I know you don’t really want to put in a lot of effort in some pre-wedding functions because you want to save all your dressing up efforts for the big day. This look is perfect for one of those functions. It just involves pulling some curls away from your face and pinning them back.
What You Need
- Texturizing spray
- 1 inch curling iron
- Bobby pins
- Wide toothed comb
- Maang teeka
How To Style
- Prep your washed, dried hair with some texturizing spray.
- Using a 1 inch curling iron, curl all your hair.
- Run a wide toothed comb through your curls to give them a messed up look.
- Part your hair down the middle.
- Pick up all the hair from the front and pin it back in the center at the back of your head.
- Finish the look by attaching a maang teeka along your parting.
21. Accessorized Fishtail Braid

Image: Instagram
Sometimes doing a regular braid can make your hair look flat, and you end up looking boring. So why don’t you dress up that braid by bumping it up to give your hair some volume? Also, add some fancy U pin accessories to add some bling!
What You Need
- Texturizing spray
- Bobby pins
- Hair elastics
- U-pins with fancy attachments
- Strong hold spray
How To Style
- Prep your washed, dried hair with some texturizing spray.
- Part your hair on one side.
- Pick up all the hair from the front of your face on the left side, twist it thrice, and pin it back in the center of the back of your head.
- Repeat the previous step on the right side.
- Now, divide all your hair into 2 parts.
- Pick up a thin section of hair from the outer side of the right section and add it to the inner side of the left section.
- Next, pick up a thin section of hair from the outer side of the left section and add it to the inner side of the right section.
- Repeat the 2 previous steps alternately until you reach the end of your hair. Secure the braid with a hair elastic.
- Insert your U-pins with the fancy attachments on top all along the length of your braid.
- Gently tug apart the braid from the center to give it a more relaxed look.
- Finish off the look with a few spritzes of strong hold hairspray to prevent the braid from unraveling throughout the day.
22. Sea Salt Braid

Image: Instagram
Gone are the days when you had to oil your hair and braid it tightly for school. But let’s face it – that simple braid meant that you did not have to put in too much thought into how to do up your hair. This sea salt sprayed braid keeps your effort to the minimal and also adds a fun, messy look to your hair.
What You Need
- Sea salt spray
- Hair elastic
How To Style
- Prep your washed, dried hair with some sea salt spray.
- Braid your hair as sloppily as you want and secure it at the end with a hair elastic.
- Pull out your bangs and some more sections of hair from the front of your face to finish the messy look.
23. Floral Ringlet Bun

Image: Source
When it comes to fancy hair, you should either go big or go home. And this hairstyle definitely goes big with its elaborate ringlet bun and a big flower to add that oomph-factor that you are looking for.
What You Need
- Texturizing spray
- Thin hair elastics
- Bobby pins
- Strong hold hairspray
- A big flower
How To Style
1. Prep your washed, dried hair with some texturizing spray.
2. Pick up half of your hair from the top and French braid it till you reach the top of your ears, then secure it with a hair elastic.
3. Leaving aside the hair from your French braid, pick up the rest of your hair and tie a simple bun, making sure to place it off center.
4. Pick up a 1 inch section of hair from the hair left under your French braid, roll it into a ringlet, and secure it onto the bun using bobby pins.
5. Repeat the previous step until all the hair from the French braid has been pinned to the bun.
6. Attach a big flower next to your bun using bobby pins.
7. Finish off the look with a few spritzes of strong hold hairspray.
24. Floral Curls

Image: Source
That curly, messy look has already been done in an infinite number of versions. But, when you pull back some curls and add in a few flowers to, you can totally invent your own look and play around with the size and type of flower to create some more versions.
What You Need
- Heat protectant serum/spray
- Texturizing spray
- 1.5 inch curling iron
- Bobby pins
- Hair elastics
- Medium sized flowers
- Strong hold hairspray
How To Style
1. Prep your washed, dried hair with some heat protectant and texturizing spray.
2. Using a 1.5 inch curling iron and picking up 1 inch sections of hair at a time, curl all your hair.
3. Add a few spritzes of strong hold hairspray to set the curls in place.
4. Pick up all the hair from the front of your face and pin it at the back of your head.
5. Leaving aside a few curls on either side, divide all your hair into 2 sections.
6. Intertwine both sections of hair with each other until you reach the end and secure them with a hair elastic.
7. Insert some flowers all over your hair and secure them with some bobby pins.
8. Finish off the look with a few more spritzes of strong hold hairspray.
25. Half Up Beehive

Image: Source
Throw it back to the eighties with half-up half down beehive look. Though it’s not a full-sized beehive (god, why would anyone even want that in today’s day and age?), this bumped up look with curls will manage to add a retro feel to your look.
What You Need
- Heat protectant serum/spray
- 1 inch curling iron
- Fine toothed comb
- A bumpit (big size)
- Bobby pins
- Smoothening serum
- Maang teeka
How To Style
1. Prep your washed, dried hair with some heat protectant.
2. Using a 1 inch curling iron and picking up 1 inch sections of hair at a time, curl the bottom half of all your hair.
3. Section away the top half of your hair and insert a big bumpit under it.
4. With the help of a fine toothed comb, smooth over the top half of your hair to hide the bumpit.
5. Gather all the hair covering the bumpit in and pin it in the center at the back of your head.
6. Complete the look by putting on a maang teeka.
26. Classic Fishtail Braid

Image: Instagram
Yes, I know I’ve already taken you through some different versions of a fishtail braid. But, nothing beats the charm and elegance of a classic fishtail braid (or khajoori choti, as it is called in Hindi), which can be dressed up or dressed down, depending on your mood.
What You Need
- Texturizing spray
- Hair elastics
- Smoothening serum
How To Style
- Prep your washed, dried hair with some texturizing spray.
- Tie up all your hair in a ponytail at the nape of your neck, using a thin hair elastic.
- Divide the ponytail into two sections.
- Pick up a thin section of hair from the outer side of the right section and add it to the inner side of the left section.
- Next, pick up a thin section of hair from the outer side of the left section and add it to the inner side of the right section.
- Repeat the 2 previous steps alternately until you reach the end of your hair and secure the braid with a hair elastic.
- Cut and remove the hair elastic at the top of your braid.
- Flip the braid to the front on one side and finish off with some smoothening serum to get rid of any frizz.
27. Messy Pulled Back Fishtail Braid

Image: Instagram
Now, this is a look perfect for the Sangeet night. While the pulled back curls add volume and dimension to your hair, the flower enhances your whole look. Moreover, the braid is perfect to keep your hair out of your face and dance the night away.
What You Need
- Texturizing spray
- Heat protectant serum/spray
- 1.5 inch curling iron
- Hair elastics
- Bobby pins
- A big flower
- Medium hold hairspray
How To Style
1. Prep your washed, dried hair with some heat protectant and texturizing spray.
2. Picking up 1 inch sections at a time, curl all your hair.
3. Leaving aside a few curls at the front, simply braid the rest of your hair in the fishtail style and secure it at the end with a hair elastic.
4. Gently pull back the curls that you left in front and loosely pin them to the back of your head.
5. Pin a big flower in the center of the back of your head and finish off with some medium hold spray to set the curls in place.
28. Twisted Bangs With Fishtail Braid

Image: Instagram
Admit it – as much as you love your bangs for covering your forehead and helping you stay in style, sometimes they can be bothersome. So this look makes your life easier as it involves twisting away and pinning back your bangs.
What You Need
- Texturizing spray
- Heat protectant serum/spray
- 1 inch curling iron
- Hair elastics
- Bobby pins
- Medium hold hairspray
How To Style
- Prep your washed, dried hair with some heat protectant and texturizing spray.
- Picking up 1 inch sections at a time, curl all your hair.
- Leaving aside a few curls at the front, tie a ponytail with the rest of your hair to fishtail braid it.
- Pick up a thin section of hair from the outer side of the right section and add it to the inner side of the left section.
- Next, pick up a thin section of hair from the outer side of the left section and add it to the inner side of the right section.
- Repeat the 2 previous steps alternately until you reach the end of your hair and secure the braid with a hair elastic.
- Now, cut off the hair elastic at the top of your braid.
- With the curls that had been sectioned off at the front, part your hair to one side.
- On each side, gently pull back the curls, twist them twice, and loosely pin them to the back of your head.
- From the tail of your braid, pick up a strand of hair and wrap it around the hair elastic to hide it and secure it with a bobby pin.
- Finish off with a few spritzes of medium hold hairspray and a few flowers to complete the look.
29. Inverted French Braid Bun

Image: Instagram
Honestly, it took me a good 10 minutes to figure out how Deepika Padukone’s hairstylist achieved this look. But once I did figure it out, I realized that it is not that difficult to do. This edgy look is perfect for a night out on the town.
What You Need
- Texturizing spray
- Sectioning clips
- Hair elastics
- Bobby pins
- U pins
- Strong hold hairspray
How To Style
1. Prep your washed, dried hair with some texturizing spray.
2. Starting from your ears, pick up half of your hair and section it away with the help of a sectioning clip.
3. Now bend your head forward and flip all your hair in front of you.
4. French braid this hair, starting from the nape of your neck towards the top of your head.
5. Once you have reached the top of your head where you sectioned away your hair, tie a hair elastic on the French braid.
6. Remove the sectioning clip and roll all of your hair into a messy bun.
7. Secure the bun to the top of your head with the help of a hair elastic, some bobby pins, and U pins.
8. Finish off the look with some strong hold hairspray to complete the look.
30. Bejeweled Pulled Back Braids

Image: Instagram
This look can be dressed up with traditional Indian outfits, as well as a Western gown. All this look requires is 2 simple braids pulled back and accessorized with a bejeweled center clip to make it party-ready.
What you need
- Texturizing spray
- Heat protectant serum/spray
- 1.5 inch curling iron
- Bobby pins
- A bejeweled center clip
- Light hold hairspray
How To Style
- Prep your washed, dried hair with some heat protectant and texturizing spray.
- Picking up 2 inch sections of hair at a time, curl all your hair.
- Pick up the hair from the front of your face (from your left temple to the right temple), pull it back, and pin it to the back of your head with some bobby pins criss-crossed over each other.
- Pick up a 3 inch section of hair from above your left ear and simply braid it right till the end.
- Pin this braid above your right ear with some bobby pins.
- Repeat steps 4 and 5 on the right side.
- Clip on a bejeweled center clip on the back of your head, under the braids.
- Spray on some light hold hairspray to finish the look.
31. Gold Caged Braid

Image: Instagram
Ok, listen up. This is literally the easiest way to make a simple braid fit for a big function. All you need to do is simply braid your hair then entwine some gold lace around it. That’s it. It cannot get simpler – or prettier – than this.
What You Need
- Texturizing spray
- 1 inch curling iron
- Hair elastics
- Thin gold ribbon
- Smoothening serum
How To Style
- Prep your washed, dried hair with some texturizing spray.
- Part your hair to one side.
- Do a simple braid with all of your hair and secure it at the end with a hair elastic.
- Take a thin gold ribbon that is at least twice as long as your braid.
- Place the center of your ribbon behind the top of your braid.
- Now, criss-cross and intertwine the ribbon all along the length of your braid.
- Once you have reached the end of your braid, remove the hair elastic from the end and put it back on with the ribbon tucked in.
- Finish off the look by curling the ends of your bangs and with a few spritzes of light hold hairspray.
32. Loose Braid With Voluminous Bangs

Image: Instagram
This look is perfect for completing the bridal look. It adds volume on top of your head, which in turn helps to perfectly hold up your ghungat. The loose messy braid does gives off the illusion of your hair being open even though it’s not. It’s a win-win!
What You Need
- Texturizing spray
- Heat protectant serum/spray
- Sectioning clips
- 2 inch curling iron
- A bumpit (medium sized)
- Fine toothed comb
- Bobby pins
- Hair elastics
- Baby’s breath flowers
- Strong hold hairspray
How To Style
- Prep your washed, dried hair with some heat protectant and texturizing spray.
- Section off all the hair on the front of your head, from ear to ear, using sectioning clips.
- With a 2 inch curling iron and picking up 2-3 inch sections of hair at a time, curl all your hair at the back.
- Insert a bumpit under your hair at the back and use a fine toothed comb to cover it with hair and hide it from view.
- Gather the hair at the back and pin it in the center at the back of your head.
- Now, flip all your hair over any one shoulder and braid it in a super loose manner, securing the braid at the end with a hair elastic.
- With the front section of your hair, create a deep parting on one side.
- On the side with more hair, gather all the hair and roll its ends into one big ringlet.
- Pin this ringlet of hair above your ear.
- Simply pull back and pin the hair on the other side.
- Insert some sprigs of Baby’s breath flowers into your braid.
- Finish off with some strong hold hairspray to set the style.
33. Curls With A Floral Centerpiece

Image: Instagram
Now, here’s another floral look. Instead of using some store-bought center clip, all you need to do is pin on some flowers in a straight line after pinning back some hair to give off the impression that it’s the flowers keeping the hair in place!
What You Need
- Texturizing spray
- Heat protectant serum/spray
- 1.5 inch curling iron
- A bumpit (medium sized)
- Fine toothed comb
- Bobby pins
- Some medium sized flowers
- Strong hold hairspray
How To Style
1. Prep your washed, dried hair with some heat protectant and texturizing spray.
2. Picking up 1 inch sections of hair at a time, curl all your hair.
3. Insert a bumpit under your hair at the top of your head and cover it with hair to hide it from view with the help of a fine toothed comb.
4. Gather all your hair from both sides of your face and pin it in the center at the back of your head.
5. Pin some flowers in a line over the bobby pins at the back of your head.
6. Finish off with some strong hold hairspray to prevent the curls from unraveling through the day.
34. French Twisted Messy Bun

Image: Instagram
Sometimes, a messy bun can end up looking plain sloppy, instead of cute. Here’s the solution to that problem – French twist your bangs away from your face to make it look like you have put in a little more effort that you actually did.
What You Need
- Sea salt spray
- Bobby pins
- Hair elastics
How To Style
1. Prep your washed, dried hair with some sea salt spray.
2. Part your hair down the middle.
3. From right next to the left side of your parting, pick up a 2 inch section of hair and start French twisting it towards your ear by adding more hair with each subsequent twist.
4. Once you reach near your ear, simply twist the hair in your hand and pin it at the back of your head.
5. Repeat steps 3 and 4 on the right side.
6. Twist all your hair up and roll it into a loose, messy bun at the nape of your neck. Secure it with a hair elastic.
35. Sea Salt Curls

Image: Instagram
Awww man, Aliaa Bhatt can make even the most basic of hairstyles look super duper cute. This ultra easy look requires you to blowdry your hair with a diffuser and just spritz on some sea salt spray to complete the beachy curls look.
What You Need
- Texturizing spray
- Sea salt spray
- Blowdryer with a diffuser attachment
- Paddle brush
- Elastic headband
How To Style
1. Prep your washed, wet hair with some texturizing spray.
2. With the diffuser attached to your blowdryer, your head flipped forward and your hair hanging in front of you, blowdry all your hair.
3. Lightly run a paddle brush through your hair to unravel some curls
4. Spritz on some sea salt spray and scrunch up all your hair with your hands.
5. Put on the elastic headband around the crown of your head.
6. Pull out hair from under the headband near your ears to finish the look.
36. Messy Ponytail

Image: Instagram
OK, I don’t think I need to be poetic about this look. Shraddha Kapoor’s simple ponytail can be achieved by even an 8 year old, it’s that easy. But, oh my, doesn’t it cause some major head turns? Just spray on some sea salt spray to add texture to your ponytail – and voila! Look complete.
What You Need
- Sea salt spray
- Paddle brush
- Hair elastic
How To Style
1. Prep your washed, dried hair with some sea salt spray.
2. Scrunch up your hair with your hands to create some loose waves.
3. Leaving your bangs out, brush back your hair and tie it into a high ponytail at the back of your head.
4. Part your bangs to one side and spritz on some more sea salt spray to complete the look.
37. Twisted Back Waves

Image: Instagram
Aditi Rao Hydari’s adorable face could make a saint out of a sinner. But that’s not what we’re here to talk about. Her twisted and pulled back hair with voluminous waves adds a sense of innocence to her whole look.
What You Need
- Heat protectant serum/spray
- 2 inch curling iron
- Paddle brush
- Bobby pins
- Smoothening serum
How To Style
- Prep your washed, dried hair with some heat protectant.
- Picking up 2 inch sections of hair at a time, curl all your hair.
- Gently run a paddle brush through your curls to loosen them up.
- Part your hair down the middle.
- From right next to the left side of your parting, pick up a 3 inch section of hair and start French twisting it towards your ear by adding more hair with each subsequent twist.
- Once you reach near your ear, simply twist the hair in your hand and pin it at the back of your head.
- Repeat steps 3 and 4 on the right side.
- Finish off the look with some smoothening serum to get rid of any frizz.
38. Multi Braid Ponytail

Image: Instagram
Do you have a sangeet function coming up? A dandiya night, maybe? Whatever it may be, if it involves dancing, this look is perfect for that occasion. And though it looks intricate, this braided style is very easy to do.
What You Need
- Texturizing spray
- Heat protectant serum/spray
- Hair elastics
- Bobby pins
- Light hold hairspray
How To Style
- Prep your washed, dried hair with some heat protectant and texturizing spray.
- Straighten all your hair.
- Part your hair onto one side.
- From near your left ear, pick up a 2 inch section of hair and braid it until the very end, then secure it with a hair elastic.
- From right next to your first braid, pick up another 2 inch section of hair and braid it the same way.
- Keep picking up sections of hair and braiding them until you reach your right ear. You will probably get 5 braids – 2 on one side of your parting and 3 on the other side.
- Gather all of your hair, along with the braids, and tie it into a low ponytail.
- Remove the hair elastics from your braids and open the braids till the base of your ponytail.
- Finish off with some light hold spray to set the braids in place.
39. Hippie Half Bun

Image: Instagram
So, you wish you had spent your youth in the hippie 70s era, huh? Well, I can’t help you travel back in time, but I can certainly help you look like a hippie straight out of 70s era India. All you need is to do up half of your hair in a bun and put a necklace around your head to complete the look.
What You Need
- Texturizing spray
- Heat protectant serum/spray
- 1.5 inch curling iron
- Hair elastics
- Bobby pins
- Paddle brush
- A golden necklace
How To Style
1. Prep your washed, dried hair with some heat protectant and texturizing spray.
2. Picking up 2 inch sections of hair at a time, curl all your hair.
3. Gently run a paddle brush through your hair to open up the curls.
4. From around your ears, pick up half of your hair and twist it right till the end.
5. Roll up this twisted hair into a bun and secure it to the top of your head by pushing bobby pins into the bun.
6. Finish off the look by placing a golden necklace around your forehead and attaching it with bobby pins to the back of your head.
40. Braided Tiara With Curls

Image: Instagram
Look like a princess with this look that involves thin braids being fashioned to look like a tiara. The ringlets pinned at the back of your head and the well defined curls make this look fit for a grand function.
What You Need
- Heat protectant serum/spray
- Straightening iron
- 1 inch curling iron
- Bobby pins
- Light hold hairspray
How To Style
- Prep your washed, dried hair with some heat protectant.
- Straighten all your hair.
- Picking up 2 inch sections of hair at a time, curl only the lower half of all your hair.
- Create a deep parting on one side.
- Leaving out about a 2 inch section from the front, pick up a 1 inch section of hair from right next to your parting and braid it till the end.
- Pick up another 1 inch section of hair from right next to the previous braid and repeat step 5.
- Secure both the braids to the back of your head with some bobby pins criss-crossed over each other.
- Now, pull back the hair that you had left out in the front earlier, roll its lower half into a ringlet, and pin it at the back of your head.
- Repeat the previous step on the other side.
- Finish off the look with a few spritzes of light hold hairspray.
41. Red Rose Bun

Image: Instagram
This elegant look is a beautiful combination of Indian and Spanish styles, courtesy of the red roses incorporated in it. This floral bun is perfect for pairing up with a graceful white saree, the same way Deepika has styled it.
What You Need
- Heat protectant serum/spray
- Straightening iron
- Medium hold hair gel
- Fine toothed comb
- Hair elastics
- Bobby pins
- U pins
- Roses (with 3 inch stems)
- Smoothening serum
How To Style
1. Prep your washed, dried hair with some heat protectant.
2. Picking up 2 inch sections of hair at a time, straighten all your hair.
3. Part your hair down the middle.
4. Apply some hair gel to the hair on top of your head.
5. Use a fine toothed comb to make the hair on top of your head lie as flat as possible.
6. Tie all your hair into a ponytail at the back of your head.
7. Twist the ponytail right till the end and roll it into a neat bun at the back of your head.
8. Secure the bun to your head by pushing in bobby pins and U pins into the bun.
9. Insert the roses all around the circumference of the bun and secure them in place with the help of some U pins.
10. Finish off with some smoothening serum to get rid of any frizz.
42. Messy Double Bun

Image: Instagram
Do you find tying hair up your hair in a bun boring? Then try out this hairstyle! This messy double bun look is creative because, come on, who could have thought of tying your hair into 2 buns stacked on top of one another? Such a fresh look!
What You Need
- Texturizing spray
- Hair elastics
- Bobby pins
- U pins
- Light hold hairspray
How To Style
1. Prep your washed, dried hair with some texturizing spray.
2. Starting from near your ears, pick up half of your hair and tie it into a ponytail.
3. Twist this ponytail right till the end and roll it into a messy bun.
4. Secure this bun to the back of your head by pushing some bobby pins and U pins into the bun.
5. Repeat steps 2 to 4 with the other half of your hair at the bottom and secure this bun right under the first bun.
6. Finish off the look with some light hold hairspray.
43. Mermaid French Braids

Image: Instagram
Are you a water baby who seriously believes that she was a mermaid in the past life? Then this look is for you! Feel like a mermaid on land with this look that totally makes your hair look like that mythical creature’s tail.
What You Need
- Heat protectant serum/spray
- 1 inch curling iron
- Sea salt spray
- Hair elastics
How To Style
- Prep your washed, dried hair with some heat protectant.
- Picking up 1 inch sections of hair at a time, curl all your hair.
- Part your hair down the middle.
- From right next to your parting, pick up a 3 inch section of hair and start French braiding.
- Once you’ve reached the back of your head, simply braid your hair 3-4 times and secure it with a hair elastic.
- Repeat steps 4 and 5 on the other side.
- Remove the hair elastic from both braids and tie them together with a single hair elastic.
- Finish off with some sea salt spray and scrunch up your hair with your hands to get a beachy look.
44. French Braided Half Bun

Image: Instagram
How cute does this hairstyle look! All it involves is transitioning a French braid into a bun on top of your head. It’s perfectly suited for short hair. Pair it with a pair of jeans and a casual T-shirt to give off an effortless and youthful vibe.
What You Need
- Heat protectant serum/spray
- 1 inch curling iron
- Hair elastics
- Bobby pins
- Light hold hairspray
How To Style
1. Prep your washed, dried hair with some heat protectant.
2. Picking up 1 inch sections of hair at a time, curl all your hair.
3. Gather all your hair in between your temples and start French braiding.
4. Once you have passed the top of your head, tie the braid with a hair elastic.
5. Twist all the hair in the tail of your French braid and roll it into a bun.
6. Secure this bun to the back of your head by pushing some bobby pins into the bun.
7. Finish off the look with some light hold hairspray.
45. Curls With A Bejeweled Headband

Image: Instagram
Headbands are coming back with a bang and how! Gone are the days that they were simply functional items that were to keep your hair out of your face. This bejeweled headbands will add a glamorous touch to your simple curly look.
What You Need
- Heat protectant serum/spray
- 1.5 inch curling iron
- A bumpit (big sized)
- A bejeweled headband
- Light hold hairspray
How To Style
1. Prep your washed, dried hair with some heat protectant.
2. Picking up 2 inch sections of hair at a time, curl all your hair.
3. Part your hair onto one side.
4. Insert a bumpit under the hair at the back of your head.
5. Use a fine toothed comb to smoothen hair over the bumpit to hide it from view.
6. Put on a bejeweled headband at the top of your head, where your bump begins.
7. Finish off the look by flipping all your hair over one shoulder and spritzing on some light hold hairspray.
46. Bumped Up Maang Teeka

Image: Instagram
If you have a maang teeka that you want to make the centerpiece of your look, this hairstyle is for you. The bump created over voluminous curls almost acts as a stage to showcase your elaborate maang teeka to the world.
What You Need
- Texturizing spray
- Heat protectant serum/spray
- 2 inch curling iron
- Teasing brush
- Fine toothed comb
- Bobby pins
- Paddle brush
- A maang teeka
How To Style
1. Prep your washed, dried hair with some heat protectant and texturizing spray.
2. Picking up 2 inch sections of hair at a time, curl all your hair.
3. From about 1 inch in, flip all the hair between your temples in front of you.
4. Now tease the top of the hair that is behind the front section you just flipped over.
5. Flip back the front section of the hair and smoothen it over the teased hair with the help of a fine toothed comb.
6. Gather the smoothened over hair in the center and pin it to the back of your head with the help of some bobby pins crossed over each other.
7. Finish off the look by putting on a maang teeka and a few spritzes of light hold hairspray.
47. Triple Fishtail Braid

Image: Instagram
Brace yourselves because this is not a single fishtail, not a double fishtail, but a triple fishtail braid! Yes, it takes quite some time to do up, but the end result is so spectacular that all that effort is worth it.
What You Need
- Texturizing spray
- Bobby pins
- Hair elastics
- Light hold hairspray
How To Style
1. Prep your washed, dried hair with some texturizing spray.
2. Part your hair down the middle.
3. Pick up a 3 inch section of hair from near your right temple and French fishtail braid it.
4. To do so, divide the section of hair into 2 parts.
5. Pick up a thin section of hair from the outer side of the right section and add it to the inner side of the left section.
6. Next, pick up a thin section of hair from the outer side of the left section and add it to the inner side of the right section.
7. Add a little bit of hair from outside the braid every time you do steps 5 and 6.
8. Repeat the 3 previous steps alternately until you reach the back of your head.
9. Simply fishtail braid around 8 more times, then secure the braid to the back of the head with the help of bobby pins.
10. Repeat steps 3 to 8 on the other side.
11. Gather all the hair in the back and do a fishtail braid, then secure it with a hair elastic.
12. You can remove the bobby pins holding the two small fishtail braids in place to get a cleaner look.
13. Finish off the look with some light hold hairspray.
48. Half Bun/Half Braid

Image: Instagram
Now this look is quite innovative as it combines two hairstyles. The half bun provides a beautiful sweeping effect to your hair while the braid wrapped in Baby’s breath looks absolutely gorgeous.
What You Need
- Texturizing spray
- Bobby pins
- Hair elastics
- Baby’s breath flowers
- Light hold hairspray
How To Style
1. Prep your washed, dried hair with some texturizing spray.
2. Starting from around your ears, pick up half of your hair, twist it right till the end, and roll it into a bun.
3. Secure this bun to the back of your head by pushing some bobby pins into the bun.
4. With the rest of your hair, do a loose messy braid and secure it at the end with a hair elastic.
5. Pull out and loosen the braid with your fingers to give it a more relaxed look.
6. Wrap some stems of Baby’s breath around the braid to finish the look.
49. Floral Mixed Braid

Image: Instagram
I’m pretty sure this is not the newest idea in the book but that does not mean that it does not look cute. The combined effect of two French braids swooping into a fishtail braid is gorgeous by itself. But adding roses to the look just takes it to a whole new level.
What You Need
- Texturizing spray
- Bobby pins
- Hair elastics
- 3 roses (with 2 inch long stems)
- Light hold spray
How To Style
1. Prep your washed, dried hair with some texturizing spray.
2. Part your hair down the middle.
3. From right next to the right side of your parting, pick up a 3 inch section of hair and start French braiding.
4. Once you reach the back of your head, bobby pin the French braid in place.
5. Repeat steps 3 and 4 on the other side.
6. Now gather all your hair at the back and start fishtail braiding.
7. To do so, divide all your hair into 2 parts.
8. Pick up a thin section of hair from the outer side of the right section and add it to the inner side of the left section.
9. Next, pick up a thin section of hair from the outer side of the left section and add it to the inner side of the right section.
10. Repeat steps 8 and 9 alternately until you reach the end of your hair and tie it with a hair elastic.
11. Gently pull out the fishtail braid from the center to make it look wider and to give it a messy look.
12. Finish off by inserting the 3 roses into the braid and a few spritzes of light hold hairspray.
50. Pearls Entwined Braid

Image: Instagram
Are you looking for the best hairstyles for Indian brides? We know that you want to look a royal queen on the biggest day of your life. This is why we suggest you try out this opulent look that incorporates a string of pearls into your otherwise regular braid.
What You Need
- Texturizing spray
- Bobby pins
- Hair elastics
- A string of pearls (twice the length of your hair)
- A maang teeka headdress
- Light hold hairspray
How To Style
1. Prep your washed, dried hair with some texturizing spray.
2. Pick up a 2 inch section of hair from near your left ear, twist it 3 times, then pin it to the back of your head.
3. Repeat this step on the other side.
4. Divide all your hair into 3 parts, as you would for a braid.
5. Fold your string of pearls in half, place it under the middle section of your hair, and add one side of the string to each of the side sections of hair.
6. Now simply braid your hair and tie it at the end with a hair elastic.
7. Finish the look by putting on a maang teeka headdress and a few spritzes of light hold hairspray.
Indian hairstyles are beautiful, whether they are simply done or intricately woven. Since Indian hair is thick, lush, and beautiful, it only makes sense that Indian women style their hair so perfectly. Experiment with the 50 hairstyles listed above, starting from a Zari French braid and ending with a pearl-entwined braid. You can amp up these hairstyles by playing around with Indian hair accessories like traditional hair clips, beads, and more. No matter the occasion, you can find a flawless Indian hairstyle to flaunt!


