25 Eye-Popping Dutch Braid Hairstyles For Women To Try
A detailed guide to Dutch braid hairstyles that help you ace the look in every event
Dutch braid hairstyles are taking the hairstyling world by a sandstorm.
A Dutch braid is a tight weave that sticks out rather than blending in with your hair. It generally starts near the crown and has many names like the reverse braid, inverse French braid, and outward braid. The more you learn about achieving a Dutch braid, you will understand why it is considered a reverse or inverse French braid.
This hairstyle is versatile, and you can mix and match it with other styles too! Also, it can be used on many different occasions – from weddings to working out at the gym.
Has this weave piqued your intrigue? Keep reading to check out DIY Dutch braid styles and learn everything about these braids! Scroll down now!
In This Article
What Is A Dutch Braid?
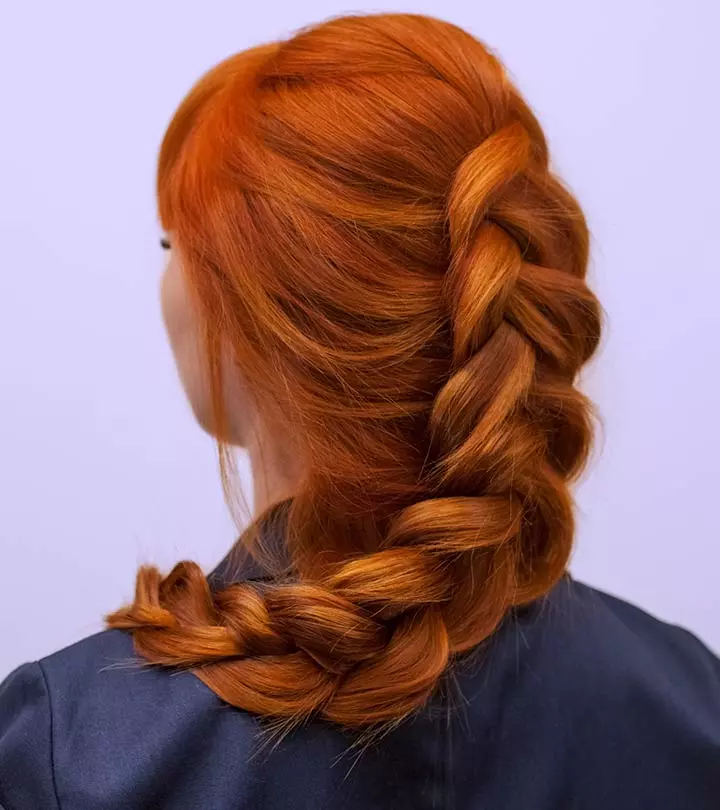
A Dutch braid is a three-strand braid consisting of two side sections and one middle section. When you weave this braid, the middle section goes over the side sections, which gives it an inverted braid look. This is why the Dutch braid is also called the inverted braid. It is aligned closely along the scalp, which makes it perfect for workouts.
There are two ways you can add hair to the Dutch braid. You can either add hair to the middle section before you cross it over the side sections. Or you can add hair to the side sections before you cross them under the middle section. The first technique works better for regular Dutch braids, and the second technique is more suitable for Dutch fishtail braid.
Now, let’s answer the question that’s on everyone’s mind…
What Is The Difference Between A Dutch Braid And A French Braid?

Shutterstock
A French braid is a three-strand braid in which the side sections go over the middle section. As you keep weaving the braid, you keep adding more hair to the sides. In a Dutch braid, the middle section goes over the side sections, and you add hair (alternating sides) to the middle section before crossing it over.
In a French braid, the braid blends with the hair and looks like it’s underneath it. But in a Dutch braid, the plait sticks out and rests on top of your hair.
Now that you know the difference between a Dutch braid and a French braid, here are 25 stunning Dutch braid styles you absolutely need to try! They’re incredibly easy to achieve and don’t take too much time either. Perfect, right?
25 Eye-Popping Dutch Braid Hairstyles
1. The Simple Dutch Braid

What You Need
- Comb
- Brush
- Elastic band
How To Do A Dutch Braid
- Brush your hair back, so it falls behind your shoulders.
- Pick up some hair from near your front hairline and divide it into three equal sections. Begin weaving a Dutch braid bypassing the side sections under the middle section.
- After the first stitch, add hair from the side to the middle section before crossing it over a side section. Add in hair from the same side as the side section that you are passing it over.
- Now, you have a new middle section. Add hair from the other side to this new middle section and pass it over the other side section.
- Continue weaving the braid in this manner until you run out of hair to add. Simply braid the rest of the way down and secure the ends with an elastic band.
2. Double Dutch Fishtail Braid

What You Need
- Comb
- Elastic bands
- Sectioning clip
How To Do
- Detangle your hair with a comb and split it in half down the middle. Clip one half up.
- Pick up some hair from the front and split it in two. Begin weaving a fishtail braid by passing one section under the other, instead of over. Keep adding hair to the braid as you weave it. Keep the braid along the curve of your head.
- Once your braid reaches the nape of your neck, secure it with an elastic band.
- Pancake the braid to make it look bigger.
- Split the tail of the braid in two and simply fishtail braid it right till the end, keeping the stitches thin this time.
- Secure the end with an elastic band.
- Braid the other half in the same manner.
3. Double Dutch Pigtails

What You Need
- Comb
- Elastic bands
- Clip
How To Do
- Part your hair down the middle.
- Split it in half from front to back, and clip up one half.
- Detangle the unclipped half with the help of a comb. Begin weaving a Dutch braid from near the parting.
- After the first stitch, keep adding hair from the sides of the unclipped half.
- Once you run out of hair to add, simply braid the rest of the way down and secure the end with an elastic band.
- Follow the same steps with the other section of hair.
4. Multiple Dutch Braids

What You Need
- Rat-tailed comb
- Hair brush
- Elastic bands
- Sectioning clips
How To Do
- Brush your hair to remove any knots and tangles.
- With the sharp end of the rat-tailed comb, divide your hair into 5 sections from front to back. You can use sectioning clips to prevent mixing up the sections.
- Unclip the first section near one of your ears. Weave a Dutch braid from the front and add hair to the braid with each subsequent stitch. Remember to keep the braid tight and close to your scalp.
- Weave the braid until the very end and tie it with an elastic band.
- Braid all the other sections in the same manner.
- If you feel your braids are too thin, you can use hair extensions to add volume to them.
5. Pancake Dutch Braid

What You Need
- Elastic bands
- Hair brush
How To Do
- Divide your hair in half down the middle.
- Brush one half and weave a Dutch braid from the front to the nape of your neck.
- The braid starts off small but becomes bigger as you keep adding hair to it. You want the braid to look a little messy, so allow stray hairs to fall out.
- Use an elastic band to secure the end of the braid.
- Pancake the braid to make it look big and voluminous.
- Braid the other half in the same manner.
6. Half Dutch Top Knot

What You Need
- Comb
- Brush
- Hair pins
- Elastic band
How To Do
- Section off the hair starting from the temples to the crown of your head.
- Tie the rest of your hair in a ponytail.
- Unclip the section that you clipped up at the top of your head. Brush and detangle that section of hair.
- Start weaving a Dutch braid from the hairline, adding hair to the braid as you go. Remember, the middle section goes over the side sections.
- Once you’ve added all the hair from this section to the Dutch braid, wrap the remaining length of hair into a top knot.
- Secure the knot in place using an elastic band and hair pins.
7. Dutch Mix Fishtail Braid

What You Need
- Comb
- Elastic bands
- Hair pins
How To Do
- Part your hair down the middle.
- Weave a Dutch braid on the side of your head, till the nape of your neck. Use an elastic band to secure the braid.
- Repeat the same on the other side.
- Remove the elastic bands from the braids, merge the hair together, and weave it into one fishtail braid.
- Secure it at the end with an elastic band.
- Pancake the braid to add volume to it.
8. Double Dutch Updo

What You Need
- Comb
- Hair pins
How To Do
- Weave two Dutch braids on the sides of your head.
- Once you reach the nape of your neck, simply braid the hair right until the end.
- Wrap both the Dutch braids to form a bun.
- Secure the Dutch braid bun in place with hair pins.
9. Half Dutch Fishtail Knot

Shutterstock
What You Need
- Rat-tailed comb
- Elastic band
How To Do
- Using the pointed end of the comb, section off the hair at the top of your head.
- Tie the rest of your hair in a ponytail to keep it out of the way.
- Comb this section to detangle it.
- Pick up a section of hair from the front of this section and split it in two.
- Take a few strands of hair from the corner of one section, pass it under the other section, and join it at the opposite end of that section. Do the same with the other half.
- For the second stitch, add some more hair from the outside to the braid before flipping it under the other section. Keep doing this alternately as you weave the braid.
- Once you run out of hair to add to the braid, tie it with an elastic band to secure it. In the last twist of the elastic band, pull out your hair only halfway through to create a half bun.
[ Read: Best Bantu Knots Hairstyles ]
10. Messy Dutch Braid

What You Need
- Comb
- Elastic band
How To Do
- Gather some hair from the crown of your head, divide it into three sections, and begin weaving it in a Dutch braid.
- As you add hair to the braid, let the hair near the ears droop a little before weaving it into the braid. This gives your hairdo a soft, romantic appeal.
- Weave the braid until the end and tie it with an elastic band.
- Pancake the braid to make it look messier.
- Allow loose strands of hair to fall out as it creates a messy appeal.
11. Dutch Halo

What You Need
- Rat-tailed comb
- Thin elastic bands
- Hair pins
How To Do
- Section your hair horizontally from ear to ear (just above both ears).
- Starting from just above the left ear, begin weaving a Dutch braid, adding hair as you go along. Follow the curve of your hairline as you braid towards your right ear.
- When you reach the right ear, curve the braid and weave the lower half of the braid along the nape of your neck.
- Once you get back to the starting point, pin the ends within the halo braid. If you have longer hair, weave the braid until the end and wrap it into a bun or tuck it into the halo.
12. Side Accent Dutch Braids

What You Need
- Brush
- Elastic bands
How To Do
- Brush your hair to remove any knots or tangles.
- Section off hair from one side of your head, from the hairline to below the crown, and from the ear to two inches above it. It will look like a rectangular section. Divide this section into half to form two rectangles.
- Weave the section closest to the ear in a loose Dutch braid. Keep it close to the scalp until you reach the tip of your ear. Then, weave the remaining length in a regular braid. Tie an elastic band at the end.
- Weave a Dutch braid with the next section as well, but this time, keep adding hair from the top of your head to the middle section. Align it parallelly to the previous braid. Secure the end with an elastic band.
13. Dutch Braid With A Bouffant Updo

What You Need
- Comb
- Hair pins
- Elastic bands
- Chignon maker
- Hairspray
How To Do
- Part your hair in an inch and half long middle parting at the front.
- Backcomb the hair at the crown of your head from the top to the bottom. Comb the top of the hair neatly and pin it below the crown to create a bouffant.
- Take some hair from one side of the parting and weave it into a horizontal Dutch braid towards the back of your head.
- Do the same on the other side as well. Secure the braids with elastic bands.
- Take the rest of your hair and wrap it around a chignon maker to form a bun. Secure it to your head with hair pins.
- Pin the Dutch braids above the chignon bun.
- Finish off with hairspray to set the updo in place.
14. Two Twist Dutch Braid

What You Need
- Elastic bands
How To Do
- Part your hair down the middle.
- Gather some hair from the front right side of your head. Twist that hair and pin it at the back.
- Repeat the same on the left side.
- Repeat steps 2 and 3 again right below the first two twists. So, now, you have four twisted sections joined at the back.
- With the hair hanging down from the four twisted sections, weave a Dutch braid.
- Secure it at the end with an elastic band and pancake the braid.
15. One-Sided Dutch Updo

What You Need
- Comb
- Hair pins
- Elastic bands
How To Do
- Comb your hair to detangle it. Comb the rest of your hair back.
- Start weaving a Dutch braid at the front, on one side.
- Weave the braid close to the hairline and only add hair from one side.
- Once you reach the back hairline, below the opposite ear, continue regular braiding the rest of the way down. Secure the end with an elastic band.
- Pancake the braid to make it look more voluminous. Wrap the braid in a low bun and secure it to your head with the help of hair pins.
16. Half Dutch Braid

What You Need
- Rat-tailed comb
- Curling iron
- Elastic band
How To Do
- Section off hair from your temples to below the crown of your head.
- Weave a Dutch braid with this section of hair.
- Once the braid reaches the back of your head, secure it with an elastic band, and let the rest of the hair from the braid hang loose.
- Curl the ends of your hair.
17. The Boho Dutch Braid

What You Need
- Hair brush
- Elastic bands
- Hair pins
How To Do
- Section off hair from one side of your head, near the front. Braid the section into a Dutch braid until the nape of your neck and secure it with an elastic band.
- Do the same on the other side. Let both the braids hang loose. You can pancake the braids to make them look soft and romantic.
- Brush the rest of your hair back and weave a fishtail braid from below the crown until the nape of your neck. Tie all the three braids together in a low ponytail.
- Wrap a small section of hair around the base of the ponytail to cover the elastic band. Use hair pins to secure to secure this section in place.
[ Read: Best Hippie Hairstyles ]
18. Double Dutch Pigtails

What You Need
- Curling iron
- Hairspray
- Volumizing spray
- Rat-tailed comb
- Elastic bands
How To Do
- If you don’t have curly hair, apply volumizing spray and hairspray and curl it.
- Part your hair carefully down the middle with the pointed end of the rat-tailed comb. Extend the parting until the nape of your neck. This will divide your hair into two sections.
- Start braiding one section in a Dutch braid from the front until the nape of your neck. Repeat the same with the other section.
- Secure both the braids with elastic bands.
- Take a small section of hair from one ponytail and wrap it around the elastic band to hide it from view. Secure this wrapped section with hair pins. Do the same with the other braid.
19. Undercut Dutch Accent Braids

What You Need
- Thin elastic bands
- Comb
How To Do
- Part your hair deeply on one side. Clip up the side with more hair.
- Divide the other side into two sections, making sure the partings for both sections begin from the first parting. One section will be triangular while the other will be rectangular.
- Weave both the sections in individual Dutch braids. Keep both the braids close to the scalp to create an undercut vibe. Once the braids have gone past your ear, weave a regular braid the rest of the way down.
- Secure the ends of the braids with thin elastic bands.
- Unclip the rest of your hair and comb it to finish off the look.
20. The U Dutch Braid

What You Need
- Hair pins
- Comb
- Elastic bands
- Hairspray
How To Do
- Part your hair down the middle and extend the parting until the nape of your neck to form two sections.
- Weave both sections into Dutch braids until the ends. Secure them with elastic bands.
- Pancake the braids to make them look big and flat.
- Cross the braids with each other at the back and bring the ends to the opposite sides of your head. Tuck the ends within the braids and secure them in place with hair pins. You can use more pins at the back to give your hairdo a perfect U shape.
- Spritz on some hairspray to set the hairdo in place.
21. Side Dutch Braids With Low Updo

What You Need
- Comb
- Elastic band
- Hair pins
- Hairspray
How To Do
- Part your hair in a deep side parting.
- Pick up some hair from the front from the side that has more hair.
- Weave a Dutch braid with the hair, adding hair only on one side. Secure the braid with an elastic band once it reaches the nape of your neck.
- Gather another section of hair right next to the first section. Weave another Dutch braid similar to the first one.
- Gather the rest of your hair and tie it in a low bun with the help of an elastic band and some hair pins.
- Wrap the braids around the bun, tucking the ends within.
- Allow loose strands of hair to fall out and frame your face.
- Spritz on some hairspray to set the updo in place.
22. The Fancy Dutch Braid

Shutterstock
What You Need
- Brush
- Rat-tailed comb
- Elastic bands
How To Do
- Brush your hair back and plait it in a Dutch braid
- Keep adding hair to the middle section for this braid.
- Secure it at the end with an elastic band.
- Using the end of the rat-tail comb, gently pull out hair from both sides of each stitch to form the extra ‘C’ around each stitch. You’ll have to use your hand to make sure you don’t pull out too much and ruin the braid.
- Repeat the previous step on all the stitches.
23. Reverse Double Dutch Knots

Shutterstock
What You Need
- Comb
- Sectioning clip
- Hair pins
- Elastic bands
How To Do
- Part your hair down the middle and divide it into two sections. Clip up one section of hair.
- Flip your hair forward and weave it in a Dutch braid, starting from the nape of your neck.
- Once you reach the crown of your head, wrap the rest of the hair in a top knot. Secure it with an elastic band and hair pins.
- Braid and tie up the other section in the same manner.
24. Four-Strand Dutch Braid

Shutterstock
What You Need
- Brush
- Elastic band
How To Do
- Brush your hair back so that it falls behind your shoulders.
- Take some hair from the front and divide it into four sections.
- Pass one of the corner sections of hair under the section beside it, over the next section, and under the other corner section.
- Pass the corner section on the opposite side under the section beside it, over the next section, and under the other corner section.
- Continue weaving the four-strand braid in this manner, adding more hair to the corner sections before weaving them in.
- Secure the end with an elastic band.
- Take some hair from the tail of the braid and wrap it around the elastic band to cover it. Secure it with hair pins.
25. Behind Dutch Braid Updo

Shutterstock
What You Need
- Hair pins
- Elastic bands
- Donut bun band
- Comb
- Hairspray
How To Do
- Divide your hair horizontally (ear to ear) into two sections. The first section consists of the front and crown hair, while the second section consists of all the hair below the crown. Clip up the second section of hair.
- Hold the first section of hair as you would a half ponytail and insert a donut band over it until it reaches the base. Slide the donut bun up all the way down until it’s an inch from the hair tips.
- Spread your hair tips around the donut bun and roll the hair and the bun towards your head. Secure the bun to your head with hair pins.
- Unclip the second section of hair and flip your hair forward. Starting from the nape of your neck, weave this section of hair in a Dutch braid until you reach the donut bun. Divide the rest of the hair from the braid into two and weave them in two regular braids.
- Cross over the two regular braids and wrap them around the donut bun, using pins to secure them in place. Tuck the ends of the braids within the bun.
- Using a hair pin, secure the main Dutch braid to the center of the donut bun.
You cannot save yourself from falling hopelessly in love with the above Dutch braid hairstyles. They make you look cute, chic, and elegant, all at the same time. And that is exactly why you should try them for your next outing.
Don’t worry if you find it challenging to make these braids. The above step-by-step tutorial can help you ace the look. We are sure you will get your desired look with a couple of trials. So, roll up your sleeves and get ready to inch closer to looking fabulous. Good luck!
Frequently Asked Questions
Is a Dutch braid the same as a cornrow?
Dutch braids and cornrows are similar but not the same as they have different weaving techniques. Cornrows are three-strand braids weaved close to the scalp to appear tight and flat. Dutch braids are three-strand braids following an inverted weaving pattern as the two sections cross under the middle.
Is it easier to Dutch braid with wet hair?
No. Dutch braids are easier to do with dry hair. However, wet hair is weaker and stretched; therefore, it would be better not to tug at it.
How do you sleep with Dutch braids at night?
You can use a silk scarf to cover your hair before bed. This will keep it protected and prevent unwanted frizziness.
Are Dutch braids painful?
No. Unless you have a sensitive scalp, the stylist is tugging at your locks too harshly or braiding your hair too tightly, Dutch braids are not painful.


