20 Stunning DIY Prom Hairstyles For Short Hair
Flaunt your tresses and be the diva with these fresh, beautiful, & versatile options.
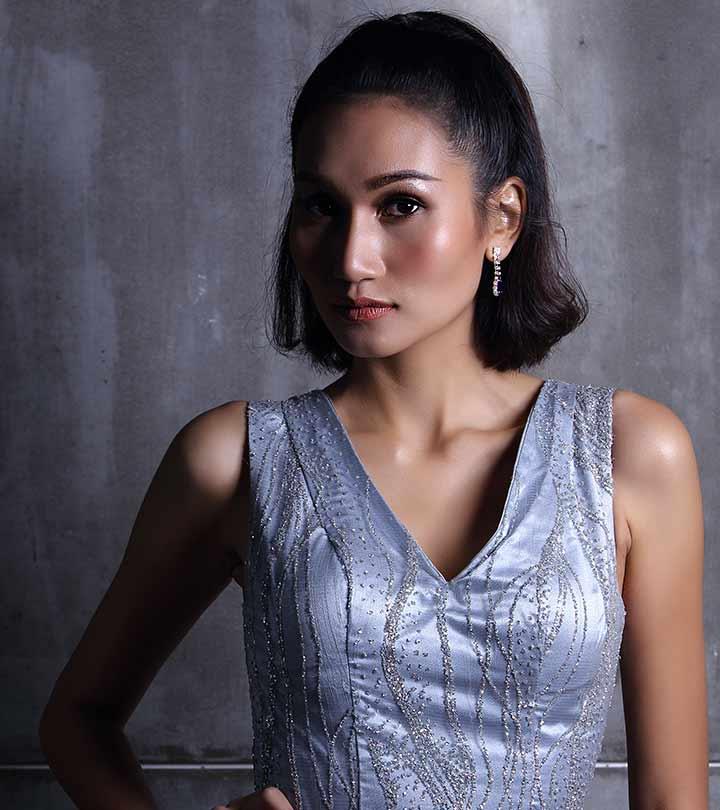
Ever since high school started, you probably dreamt of the perfect prom. You may have your date, dress, shoes, and makeup, but you think there isn’t much you can do to zhuzh up your look because you have short hair.
Here are the 20 incredible prom hairstyles for short hair to prove you wrong. Scroll down to discover a world of elegant, classy, chic, and edgy short hairstyles to flaunt at your prom. After seeing you, everyone will wish they had short hair.
So, without further ado, keep reading to check out these fabulous short hairstyles you need to try out. Swipe up!
In This Article
20 Stunning DIY Prom Hairstyles For Short Hair
1. The Elegant Tri Updo

What You Need
- Hair pins
- Elastic bands
- Sectioning clips
- Comb
- Curling iron
- Hairspray
Procedure
- Begin by curling your hair. You want to get nice big curls in the front that look natural. Keep big sections of your hair in a curling iron for about 7 seconds to curl them.
- Divide your hair into three sections: top, center, and bottom. Leave some hair out in the front. These loose strands will act as side bangs.
- Clip off the other two sections and begin with the bottom section. Wrap the bottom section of hair in a messy low bun. Pin it securely in place.
- Repeat the same with the other two sections, making sure they’re aligned one above the other.
- Spritz on some hairspray to keep the updo in place.
2. Double Braid With A Twist

What You Need
- Hair pins
- Elastic bands
- Comb
Procedure
- Comb your hair to detangle it.
- Part your hair down the middle.
- Take a small section of hair from the front on one side. Weave it into a regular braid and secure the end with an elastic band.
- Repeat the same on the other side.
- Take mid-sized sections of hair from both sides. Twist both sections and secure them together at the back of your head with an elastic band.
- Flip the twisted half ponytail up and over itself just above the elastic band.
- Take the two small braids and pin them within the twisted half ponytail.
3. The Half Bouffant

What You Need
- Hair pins
- Elastic bands
- Comb
- Hairspray
- Texturizing spray
- Fresh flowers
Procedure
- Detangle your hair and spritz some texturizing spray on it.
- Pick up some hair from the top of your head and backcomb it from the middle to the roots. This will give it a bouffant look. Comb the top of this section and neatly pin it at the back as you would a half ponytail.
- Take a small section of hair from one side and twist it and pin it over the half ponytail.
- Repeat the same on the other side.
- Allow your bangs and some stray hair to fall to the sides and frame your face.
- Accessorize the look with some fresh flowers.
4. Double Braids Side Hairdo

What You Need
- Hair pins
- Elastic bands
- Comb
- Fresh/artificial flowers
Procedure
- Take a thick 4-inch section of hair from one side and weave it into a regular braid. Secure the end with an elastic band.
- Pick up another section of hair from below the first section. Weave this second section into another regular braid.
- Pancake the braids to make them look voluminous.
- Pin both the braids at the back to keep them in place.
- Allow some stray hair to fall through as it will add to the appeal.
- Accessorize with some flowers.
5. The Heightened Bouffant

What You Need
- Hair pins
- Elastic bands
- Comb
- Hairspray
Procedure
- Backcomb the hair at the crown of your head. This will create a bouffant look. Comb the top of this section and neatly pin it in place.
- Take the rest of your hair and tie it up in a French twist.
- If you have shoulder length hair, you can simply wrap your hair in a messy bun and pin it in place.
- Finish off with some hairspray to tame any flyaways.
6. The Half Four Braid

What You Need
- Hair pins
- Elastic bands
- Comb
Procedure
- Comb your hair to detangle it completely.
- Take some hair from the front and sides and hold it at the back.
- Weave a four part braid with it. Divide your hair into four sections. Take one of the corner section, pass it under the section closest to it and over the next section. Switch it with the other corner section to make it the corner section on the other side.
- Now, take the section that you crossed the first corner section with and pass it over the section closest to it and then under the other corner section. This will make it a corner section on the opposite side.
- Keep weaving the braid until the end. Secure the end with an elastic braid.
- You can use pins to pin the braid in place.
7. The Wavy Pixie

What You Need
- Comb
- Heat protectant
- Curling iron
Procedure
- If you have short hair and are looking for a radical change, consider this uber cool pixie.
- Spritz some hairspray thoroughly on your hair.
- Keep your hair in the curling iron for about a few seconds.
- Use a comb and your fingers to style your hair as you wish.
8. The Twisted Halo

What You Need
- Hairspray
- Hair pins
- Elastic bands
- Comb
Procedure
- Depending on how short your hair is, you can either twist or braid your hair.
- Spritz a good amount of hairspray on your hair. This will give it some hold.
- Part your hair on one side at the front and start twisting or braiding it. Keep adding hair from the side as you twist it. Make sure the twist or braid is big and neat.
- Keep weaving the braid or twist until you reach the other side and you’ve used up all your hair. This should create an updo.
- Pin up the twist
- on the opposite side.
9. The Dutch Side Braid

What You Need
- Hair pins
- Elastic bands
- Comb
- Beads
Procedure
- Part your hair on one side.
- Pick up some hair from the side that has lesser hair.
- Weave a Dutch braid with this section right till the nape of your neck.
- Secure it with an elastic band.
- You can accessorize with colored hair extensions or beads to add oomph to the hairdo.
10. The Half Pony With A Puff

What You Need
- Hair pins
- Elastic bands
- Comb
- Hairspray
Procedure
- Comb your hair back using a round brush.
- Take some hair from the front and sides and hold it at the back.
- Slide this section of hair upwards. This will create a puff near the crown, giving your hair some height.
- Pin the hair in place and spritz on some hairspray.
11. The Twisted Up Prom-Do

What You Need
- Hair pins
- Elastic bands
- Comb
- Straightener
Procedure
- Comb your hair thoroughly.
- Straighten your hair.
- Take a section of hair from one side, twist it and pin it up at the back.
- Repeat the same on the other side.
- If your twists are longer than expected, simply pin them up underneath the rest of your hair. This will make it look like a twisted hair clip holding a flat ponytail.
12. Wavy Locks

Shutterstock
What You Need
- Comb
- Curling iron
- Heat protectant
Procedure
- Comb your hair and spritz on some heat protectant.
- Create waves in your hair with the help of a curling iron.
- Allow your hair to cool down for a few seconds.
- Flip your hair and shake it up. Run your fingers through it and part it on one side to complete the look.
13. The Curly Mohawk

What You Need
- Comb
- Curling iron
- Hairspray
Procedure
- If edgy is what you’re looking for, this is a killer prom hairstyle. It is perfect for making a statement.
- Get the hair at the sides of your head shaved, leaving hair only in the front and at the top and back.
- Keep sections of your hair in the curling iron for about 7-10 seconds. Curl small sections of hair to make the curls look natural. Allow the curls to cool down before touching them.
- Spritz on some hairspray to keep the curls intact.
14. A Classy Half Ponytail

Shutterstock
What You Need
- Hair pins
- Elastic bands
- Comb
- Curling iron
- Hairspray
Procedure
- Comb your hair to detangle it.
- Curl your hair.
- Take some hair from the sides and the crown and tie it at the back with an elastic band.
- Take a small curl from the front and let it fall in the front to frame your face.
- Use a comb to neaten your hair and spray some hairspray on it to keep it together.
15. One-Sided Four Weave Dutch Braid

What You Need
- Hair pins
- Sectioning clips
- Rat-tailed comb
Procedure
- Comb your hair to detangle it.
- Using a rat-tailed comb, section off some hair from one side. Clip up the rest of the hair so that it doesn’t get in the way.
- Weave this section of hair into a four part Ducth braid. Divide your hair into four sections. Take one of the corner sections, pass it under the section closest to it and over the next section. Switch it with the other corner section to make it the corner section on the other side.
- Take the section that you crossed the first corner section under and pass it over the section closest to it and then under the other corner section. This will make it a corner section on the opposite side.
- While you continue to do this, keep adding hair as you would in a Dutch braid.
- Weave this braid till the end and secure it with an elastic band.
- Unclip the rest of your hair and spray on some hairspray all over it.
- Pin the braid in such a way that its ends are hidden under your hair.
16. The Messy Goddess

Source
What You Need
- Comb
- Straightener
- Texturizing spray
Procedure
- Straighten your hair.
- Spritz on texturizing spray to make your hair wavy.
- Flip your hair and shake it to add volume to it.
17. The Retro Do

What You Need
- Hair pins
- Comb
- Curling iron
Procedure
- Curl your hair using a curling iron. If you want big, round curls, apply hairspray before using a curling iron. Keep the ends of your hair in the curling iron in one big roll.
- Allow your hair to cool before you part it on one side and pin it neatly in place.
- Spritz on some more hairspray to lock the hairstyle.
18. Simple Twists

What You Need
- Hair pins
- Elastic bands
- Comb
Procedure
- Comb your hair thoroughly.
- Pick up two sections of hair from the sides – one from each side. Clip them up and comb the rest of your hair neatly.
- Take the two sections and tie them at the back as you would a half ponytail.
- Flip the half ponytail up and over itself (above the elastic band) a few times.
- By doing this, you create tight twists above the elastic band.
19. Color It

Shutterstock
What You Need
- Hair color
- Comb
Procedure
- Go for a change and color your hair. If you have light hair, pick a dark color, and vice versa. Pick shades that are in the same tone as your hair and skin. Not all warm tones suit cool toned skin.
- Allow your roots to show if you have dark roots. Dark roots near the scalp help give the face an elongated look while also flaunting the colored shade.
- Go for a simple haircut like a messy lob since the point is to focus on the new color of the hair.
- Part your hair on one side to finish off the look.
20. Curled And Twisted

What You Need
- Hair pins
- Elastic bands
- Comb
- Curling iron
Procedure
- Detangle your hair with a comb.
- Curl the ends of your hair.
- Pick up the hair near the crown and tease it from the middle down to the roots. This will give it a bouffant look. Pin the hair at the back.
- Take some hair from one side and twist it. Pin it at the back.
- Twist and pin back two more sections of hair on the same side.
- Wrap all your hair in a bun, leaving only the ends to fall out. Pin the bun in place.
- Allow your bangs to fall freely and frame your face.
While the hairstyle itself is definitely a big deal, you can change your entire look with the help of some hair accessories. Here are some hair accessories that will wow you!
Accessories
- Clip Rings

Clip rings are all the rage right now. They can make a simple braid or ponytail look badass.
- Head Bands

Never underestimate the power of the headband! A headband is all you need to glam your hair up.
- Decorative Hair Clips

These days, you can find all sorts of designs in hairclips. Instead of using a plain old hair clip, consider using a fancy one that can transform your hairdo from a 5 to a whopping 10.
- Scarf

If your hair is untamable or you’re just having a bad hair day, consider this age-old way of covering it up. Use a snazzy scarf. Pick a scarf that goes with your dress but is flashier than your outfit.
- Flowers

Flowers can instantly change your look. They not only make your hairstyle look elegant and delicate but also add a dash of color.
Lastly, you want your prom hairstyle to stay in place. Here are a few tips that will help keep your hairdo intact until the end of the night.
How To Keep Your Prom-do Intact
- Use a good amount of hairspray. Spray it thoroughly all over your hair. Do right after you’ve styled your hair.
- Spray your hair clips, pins, and hairbrush with hairspray right before using them. This will help keep your hairstyle in place.
- Keep a compact canister of hairspray in your bag at all times.
- Don’t be afraid to use hair pins generously. Use hair pins and elastic bands that are the same color as your hair. They are available at beauty and drug stores.
This was the list of 20 amazing prom hairstyles for short hair that you can show off during your prom. Perhaps, these ideas can inspire you with a variety of prom hairstyles. Whether you go for a timeless classic design or something a little more creative and modern, your hairdo can be the perfect complement to a wonderful dress and gorgeous accessories. And perhaps you have understood that just because something appears to be complex doesn’t imply it has to take hours to complete. So here’s to a prom that makes everyone in the room turn their heads!
Frequently Asked Questions
How early should I get my hair done before prom?
You should ideally finish doing your hair a few hours before prom. This gives you enough time to change or modify your hairstyle if needed.
Should I wash my hair before prom?
Yes, you should wash your hair one or two days before prom to allow your hair to hold up well.


")


