10 Stylish Updos For Long Hair With Step-By-Step Tutorials
Learn to create the perfect updos to look your most formal and elegant self.
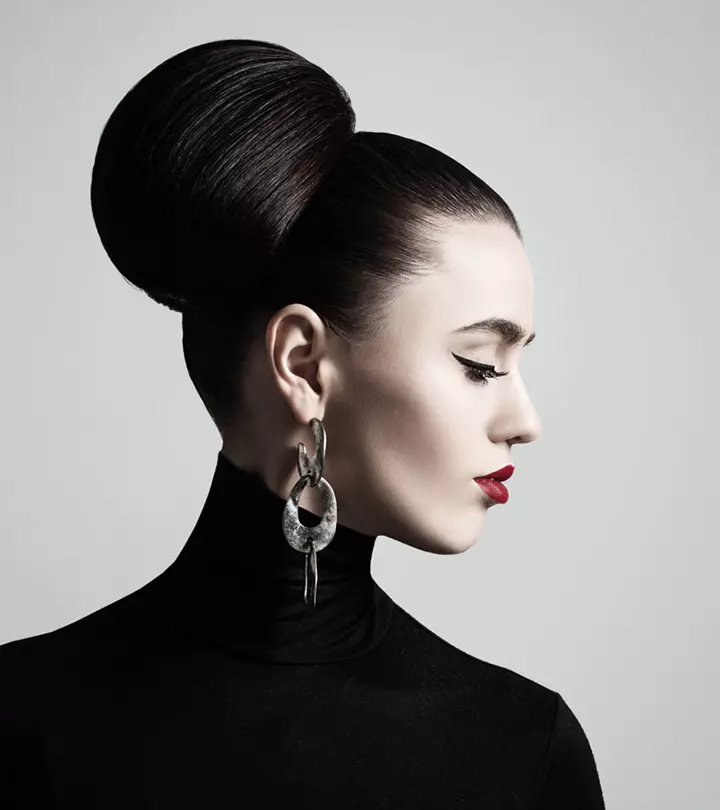
Time has given us some iconic updos like Audrey Hepburn’s stylish beehive in Breakfast at Tiffany’s. If you have long hair, styling it in a classy updo is a sure way to steal the spotlight. So, here are the 10 ethereal updos for long hair with a step-by-step tutorial so you can achieve your favorite look. From a braided updo to a messy French twist, these updos will make your morning styling sessions more fun. And they are a godsend for those hot days when you want to tie up your hair. Scroll down to check them out!
How To Do Updos for Long Hair
Here are 10 stunning DIY updo hairstyles for long hair. These hairstyles are so simple that you can try them out on your own.
1. Lace Braid Updo

The lace braid updo looks amazing on people with any face shape. The loose side draws the eye sideways, thus accentuating your eyes and mouth.
What You Need
- Hair pins
- Elastic bands
- Comb
Procedure
- Divide your hair into two halves, from the center of your forehead to the nape of your neck. Allow the front sections of your hair to fall loose
- and frame your face.
- Start braiding one section of your hair, beginning at the ear and extending all the way down to your neck. As you braid your hair, keep adding more hair into it with each subsequent stitch. Make sure the braid is a little loose as you will be moving it.
- Tie the end with an elastic band.
- Repeat the same for the other section.
- Take one braid and pin it up on the opposite side, behind your ear.
- Position the second braid over the first braid and pin it up behind your ear on the opposite side.
- You will see that there is a nice fall of hair just below the braid. This will only appear if you weave your hair loosely as you keep adding hair to the braid.
2. The Dutch Braid Bun Updo

In a braid, you have three sections: the two side sections and the middle section. Generally, the middle section always goes under the side sections. But in a Dutch braid, the middle section goes over the side sections. This is why a Dutch braid is also called an inverted French braid.
What You Need
- Elastic bands
- Hair pins
- Comb
Procedure
- Comb your hair to remove all knots and tangles.
- Pick up a small section of hair from where you want the braid to start and divide it into 3 equal sections.
- Weave your hair in two stitches of a braid. The middle section always goes under the side sections.
- After two stitches, add some hair from outside the braid to the side sections. Again, weave the hair in two stitches and then add more hair to the sides.
- Keep doing this until you reach the end of your hair and tie it with an elastic band.
- Roll the bottom half of the Dutch braid into a bun. If you have medium length hair, a flat bun will show off the braid and create a chic look. If you have long hair, a full bun will look stunning.
This hairstyle looks incredible on women with oval faces. If you have a slightly broad face, allow some strands of hair to fall to the sides of your face.
3. The Beehive Bun Updo

What You Need
- Elastic bands
- Hair pins
- Comb
Procedure
- Comb your hair to detangle it. Part your hair on one side.
- Brush all your hair to one side, holding it in place with hair pins.
- Create a bouffant at the top by holding your hair as you would a high ponytail and pushing it up. If you feel that the bouffant will not stay in place, pin it up.
- Twist the high ponytail into a French twist and pin it in place.
- Take the side sections and pin them under the French twist bun.
This updo is perfect for formal events. You can also leave some side strands loose to frame your face and add some oomph to the look.
4. The French Twist Updo

The French twist is perfect for all face shapes. If you have a square, round, rectangular or heart-shaped face, consider adding bangs to the look. Side or feathered front bangs look amazing with this hairdo
What You Need
- Elastic bands
- Hair pins
Procedure
- Detangle your hair with a comb. If you have fine textured hair, apply some dry shampoo to give it more volume.
- Gather your hair at the center of your head.
- Start twisting your hair inward (towards your head).
- Once all your hair is wrapped up, pin the bun in place.
- Allow some loose strands of hair to frame your face, giving the hairstyle a boho vibe.
5. The Puffy Ponytail

The puffy ponytail is the perfect hairdo for the working woman. Simple and quick to do, this hairstyle is sure to become a fast favorite.
What You Need
- Elastic bands
- Hair pins
- Rat tail comb
Procedure
- Comb your hair to remove all knots.
- Spritz on some hairspray or dry shampoo to add some texture and volume to your hair.
- Part your hair on one side.
- Back-comb the hair on the crown of your head and pin it in the center at the back of your head. This will create a half ponytail. Make sure to leave out the front sections of your hair.
- Apply some hairspray on this half ponytail.
- Using a curler, curl the ends of your hair.
- As you gather your hair to tie the high ponytail, you’ll notice that the half ponytail you had tied earlier forms a bouffant. Tie the ponytail in place with an elastic band. If you want the bouffant to be puffier, tug up the hair gently.
6. The Messy Bun Updo

The messy bun is one hairstyle that works for almost all events and all face shapes. The messy hair adds volume to the hairstyle, and the loose strands frame the face well.
What You Need
- Elastic bands
- Hair pins
Procedure
- Start tying your hair in a high ponytail.
- At the last twist of the elastic band, pull out your hair only halfway through to form a bun.
- Twist the ends and wrap them around the base of the bun. Use some hair pins to secure them in place.
7. The Braided Bun Updo

Shutterstock
The braided bun looks impressive on oval faces. Style it with some thick blunt bangs to frame your face nicely.
What You Need
- Elastic bands
- Hair pins
Procedure
- Detangle your hair with a comb.
- Split your hair into two sections from the hairline to the nape of your neck, leaving out your bangs.
- Weave each section into a braid.
- Pancake the braid to give it a boho feel. Pancake means to gently tug the braid apart, making it loose and big.
- Wrap the braids around each other to form a bun and secure them in place with hair pins.
8. The Korean Bun Updo

Shutterstock
The incredible Korean bun updo works for all face shapes. Style it with some curled loose side strands to add to the beauty of this hairstyle.
What You Need
- Elastic bands
- Hair pins
- Rat tail comb
Procedure
- Comb your hair to detangle it.
- Start braiding your hair into a French braid. Weave about five stitches of the braid and then tie it with an elastic band.
- Tie all your hair into a ponytail.
- Now, take the end of your ponytail and wrap it upwards and around itself until you reach the top of your head. To make sure that the ends do not unravel, tie them together with an elastic band after one wrap and then continue wrapping the hair over itself.
- Once you reach the top, pin the hair up on the sides, forming a beautiful downward French twist.
9. The Elegant Bun Updo

Shutterstock
Here’s another office essential. This elegant bun updo screams ‘boss lady’! This pretty updo works for all face shapes and accentuates the facial features very well. It is a combination of the donut bun and twists.
What You Need
- Elastic bands
- Hair pins
- Donut bun band
Procedure
- Comb your hair to detangle it.
- Divide your hair into two sections. The first section starts at the beginning of one ear and ends at the beginning of the other ear. The second section is the rest of your hair. Tie the second section up in a ponytail.
- Now, part the first section down the middle and backcomb it.
- Take the donut bun band and insert it at the base of your ponytail. Slide it to the end, arrange the hair around it (covering it), and fold it outwards while moving it towards your head. Using another elastic band, keep this in place.
- If you have very long hair, not all of your hair will fit into the donut bun. That’s fine. Once the donut bun reaches your head, tie an elastic band around it, keeping it in place, and allow the ends of your hair to hang down. Twist the ends and wrap them around the base of the bun.
- Neatly and gently, comb the first section of hair backward. Pin up the long hair neatly around the bun. Due to the backcombing, your hair will form a slight puff in front.
10. The Back Braided Bun

Besides being oh-so-easy to do, this back braided bun looks gorgeous. You can also play around with this style. For instance, you can take two sections of hair from each side, as if you were going to tie a half ponytail. Twist each section of hair inwards (towards your head) and pin it once you reach the center of your head. Then, follow the instructions given below to complete the hairstyle. You can also accessorize this braided bun with simple pin beaded flowers.
What You Need
- Rat tail comb
- Hair pins
- Elastic bands
Procedure
- Comb your hair to remove any knots.
- Divide your hair into two parts and tie them in ponytails.
- Weave each ponytail into a braid.
- Take one braid, roll it into a bun, and pin it to your head.
- Repeat the same with the other braid, positioning it over the first braid.
These updos for long hair are so beautiful and easy to achieve. But, of course, you will need the practice to perfect them. From classic styles that you can flaunt at weddings and other formal occasions to messy hairstyles you can sport at casual parties and date nights, these updos keep your long flowy locks fresh and stylish. And you can add your twist to these hairstyles! You can play around with hair colors and accessories to give these hairstyles a personalized touch. And let’s not forget, when you and your girlfriends want to have a SATC style wardrobe fashion show, these hairstyles will pair well with any outfit!


